GitHub Desktop
Download it from desktop.github.com and sign in with your GitHub account. That’s it!
Installing the class VS Code profile
I’ve bottled our entire IDE setup into a single profile. Import it once and your VS Code will have everything we need: Live Server, auto-formatting, nice file icons, error messages that show up right next to your code, and more.
Importing the profile
Step 1: Open VS Code.
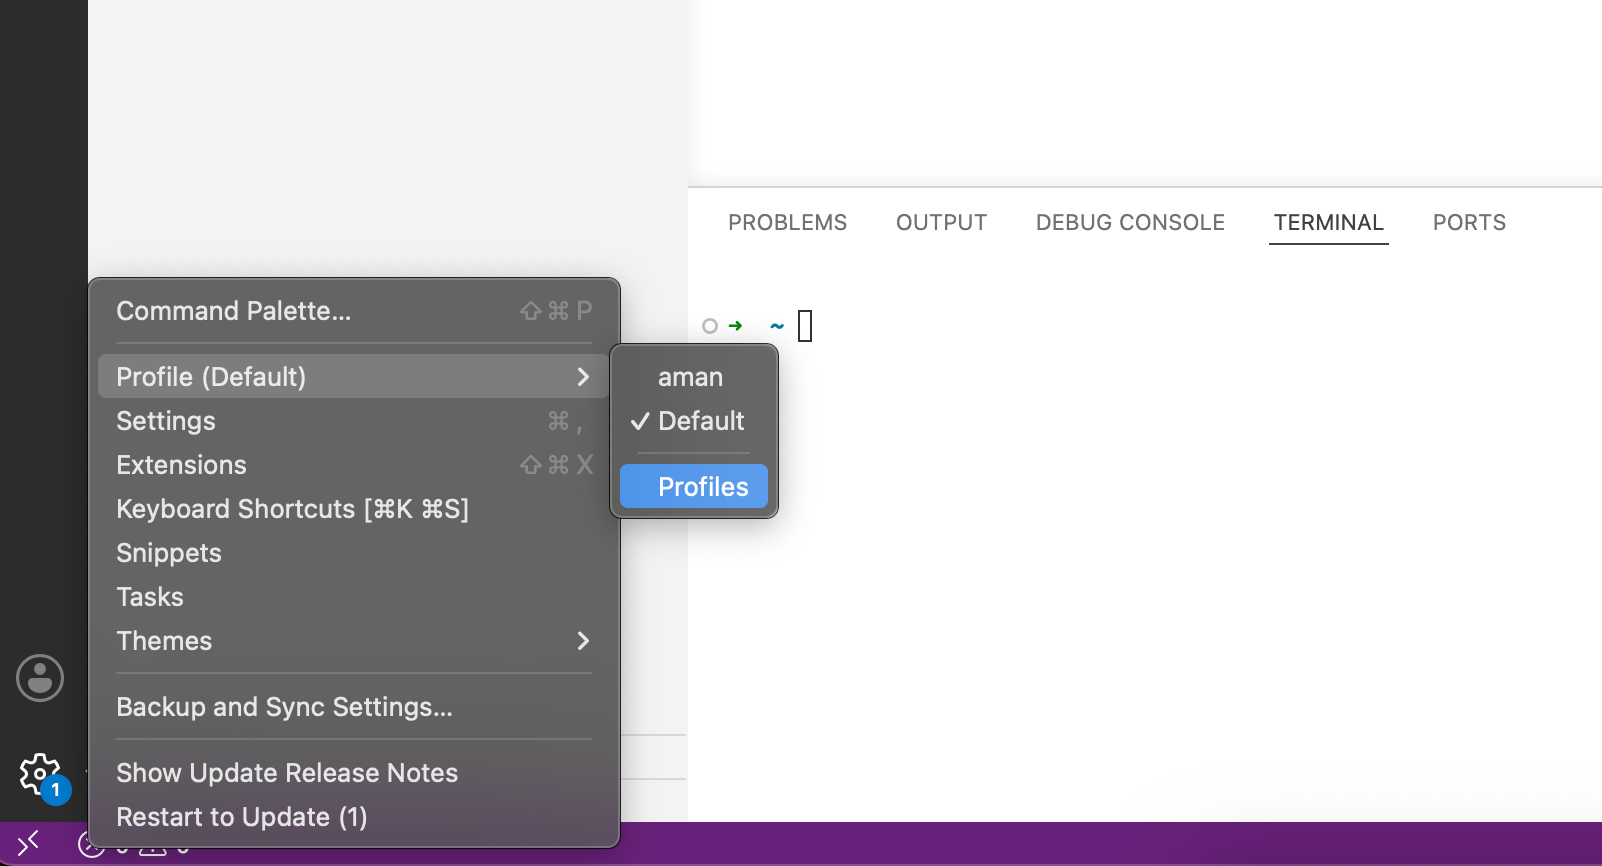
Step 2: Click the gear icon in the bottom-left corner and go to Profiles, then Import Profile…
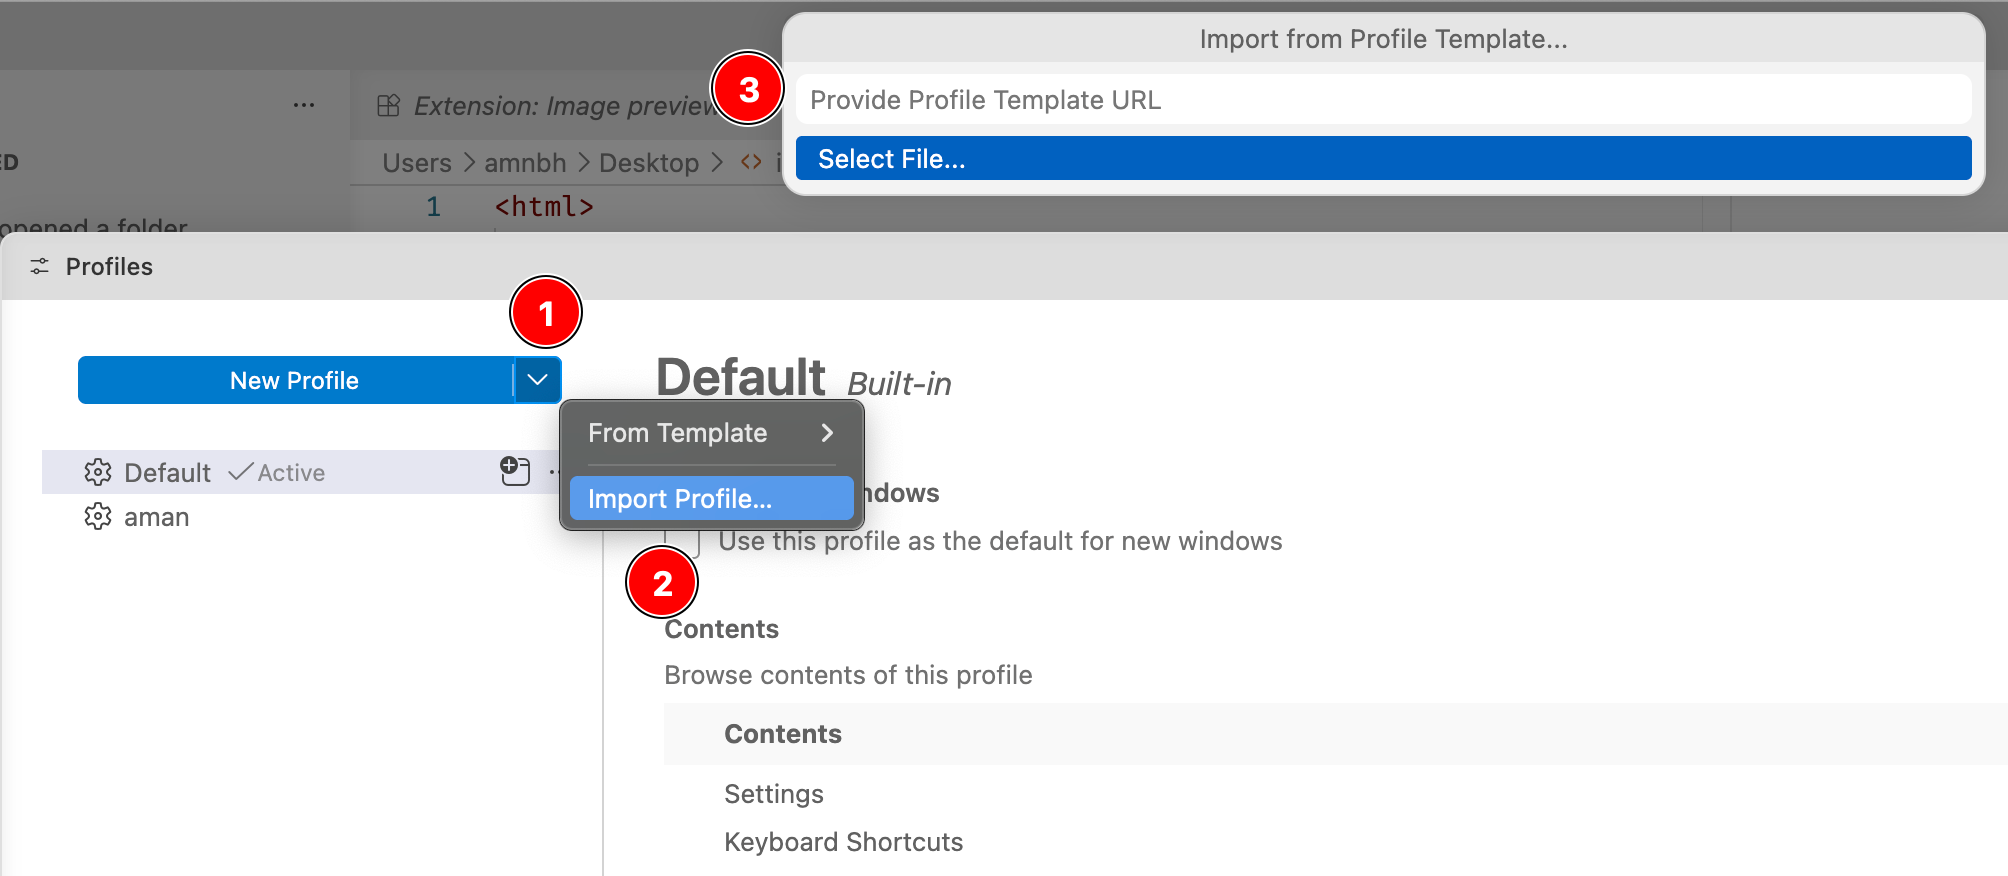
Step 3: In the box that appears, paste this link:
https://gist.githubusercontent.com/thedivtagguy/178fd4556ff9232725cda1c263d1b7e6/raw/37b489c7b63f508fd598d13029317ec65c722ce8/web2026Step 4: A panel will open showing what the profile contains (settings and extensions). Click Create.
Step 5: Wait a minute or two while the extensions install. You’ll see some activity in the bottom status bar. When it settles down, you’re done.
Checking the installation worked
Create a folder anywhere, open it in VS Code, and make a file called index.html. Type some HTML in it, right-click anywhere in the file, and you should see an option that says Open with Live Server.
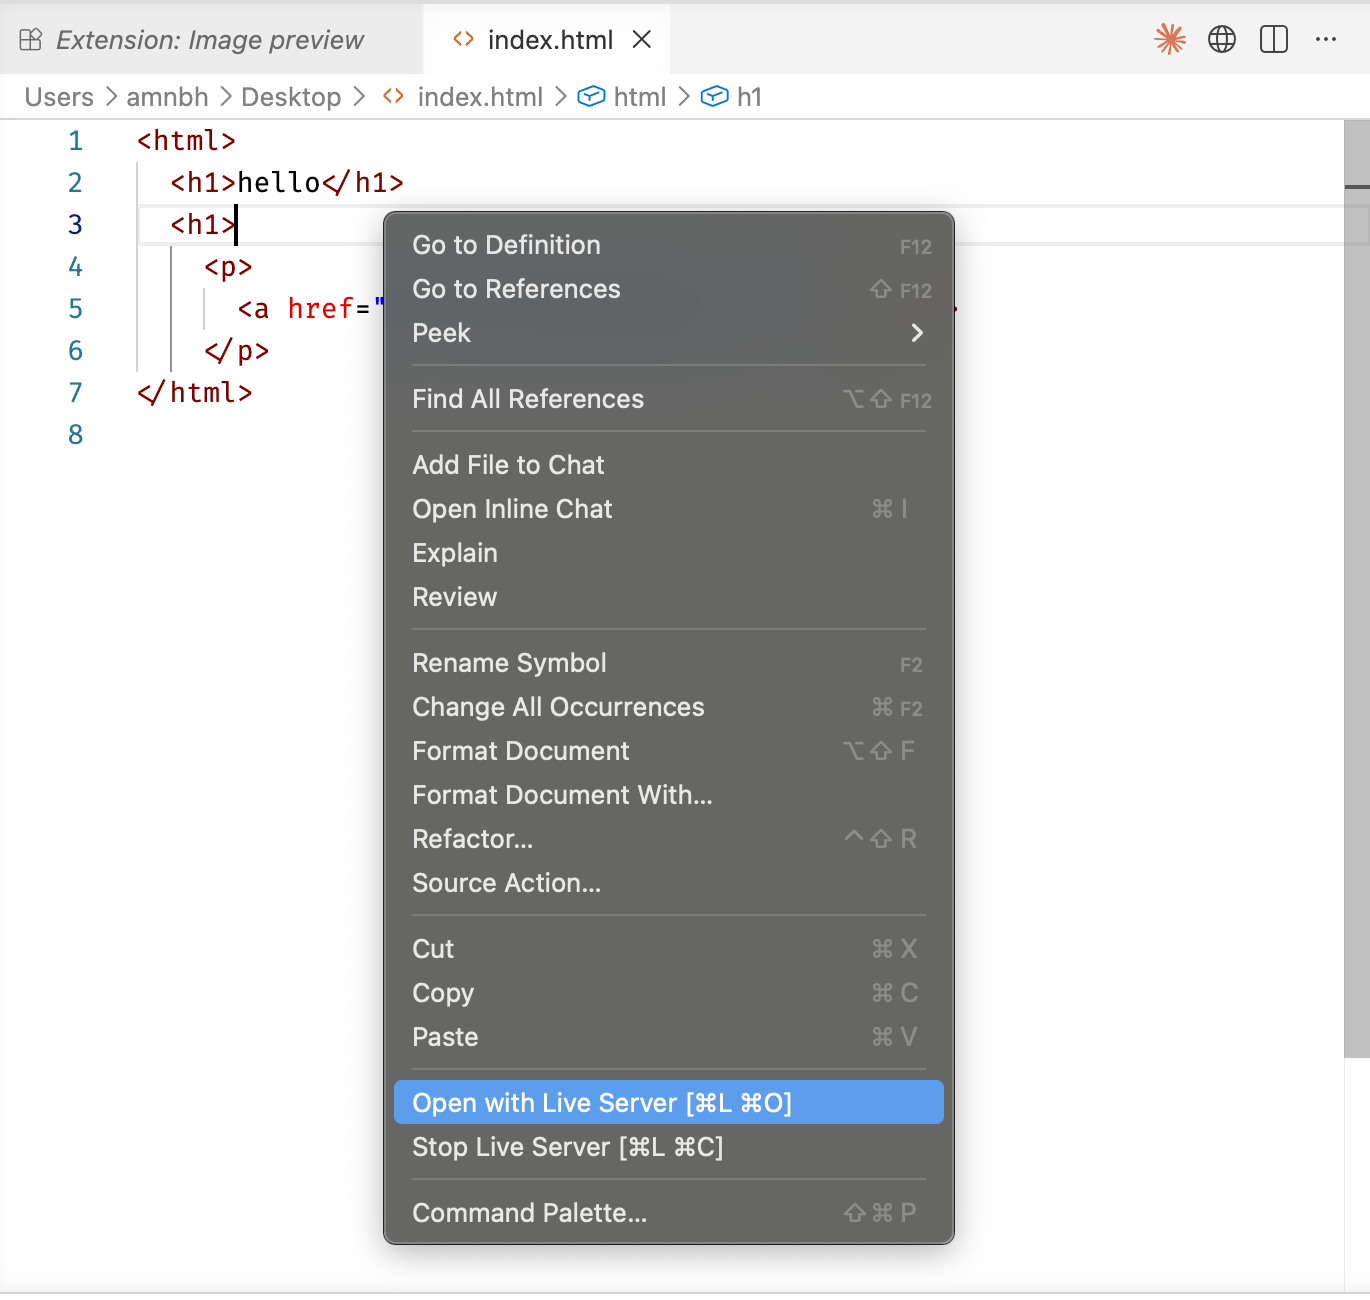
If you see it, congratulations, you’re set up. If you don’t, the extensions might still be installing, give it a minute. Still nothing? Ask for my help!
Forking a repository
Before you can clone anything, you need something of your own to clone. That’s what forking is for. A fork is your own personal copy of somebody else’s repository, sitting on your own GitHub account.
Fork vs clone
- Fork = cloud to cloud. My repo on GitHub → your repo on GitHub. You do this in the browser, and once per project.
- Clone = cloud to laptop. Your repo on GitHub → a folder on your computer. You do this in GitHub Desktop.
How to fork
Step 1: Open the repository I’ve given you in your browser. Make sure you’re signed in to GitHub, otherwise the button won’t be there.
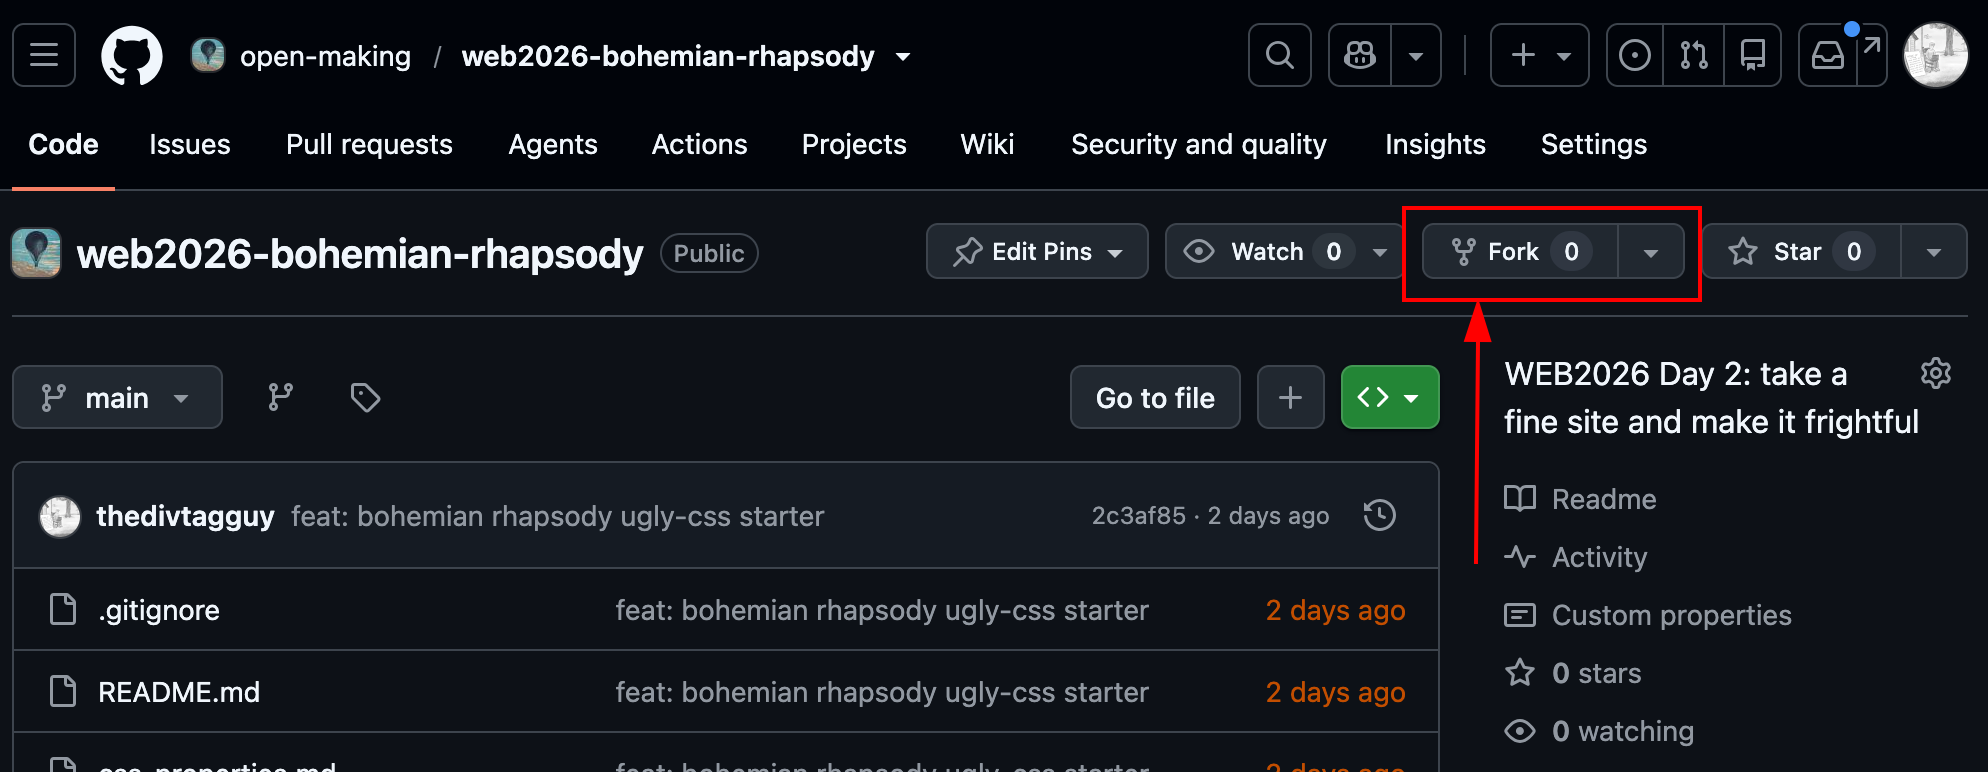
Step 2: Click Fork, at the top right of the page.
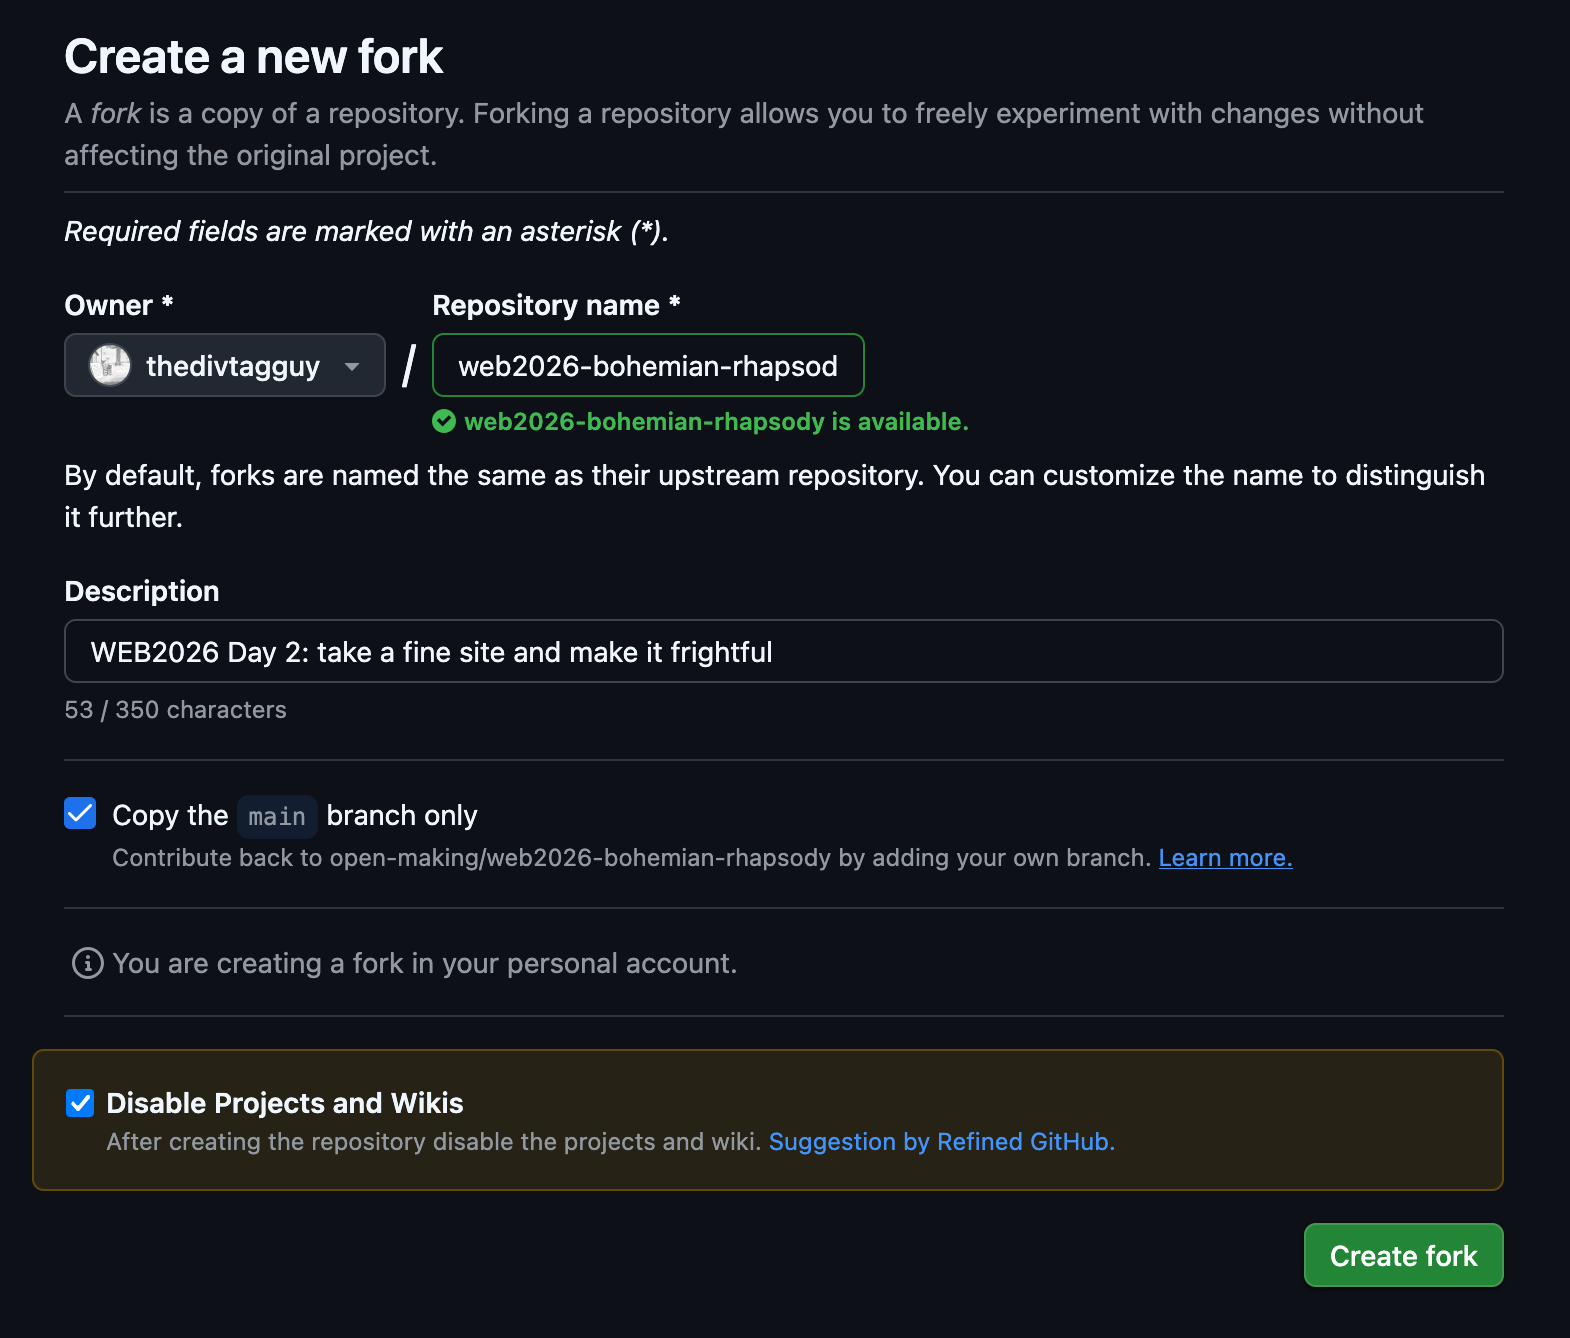
Step 3: A settings page appears. The Owner should be your username, and the repository name will be the same as mine, which is fine. Ignore the rest.
Step 4: Click Create fork and wait a few seconds.
Checking it worked
Look at the top of the page you land on. It should say your-username / repository-name, not mine, and underneath it in small grey text, “forked from …“.
That’s your copy! You can now clone it.
Using GitHub Desktop
GitHub Desktop is how we’ll save and publish our work for the first week.
Cloning a repository
Cloning means downloading a copy of a project from GitHub onto your laptop, with the connection between the two kept alive. You edit the copy on your laptop, and later send your changes back up.
Step 1: In GitHub Desktop, go to File > Clone Repository (or click the big “Clone a repository” button if you see one).
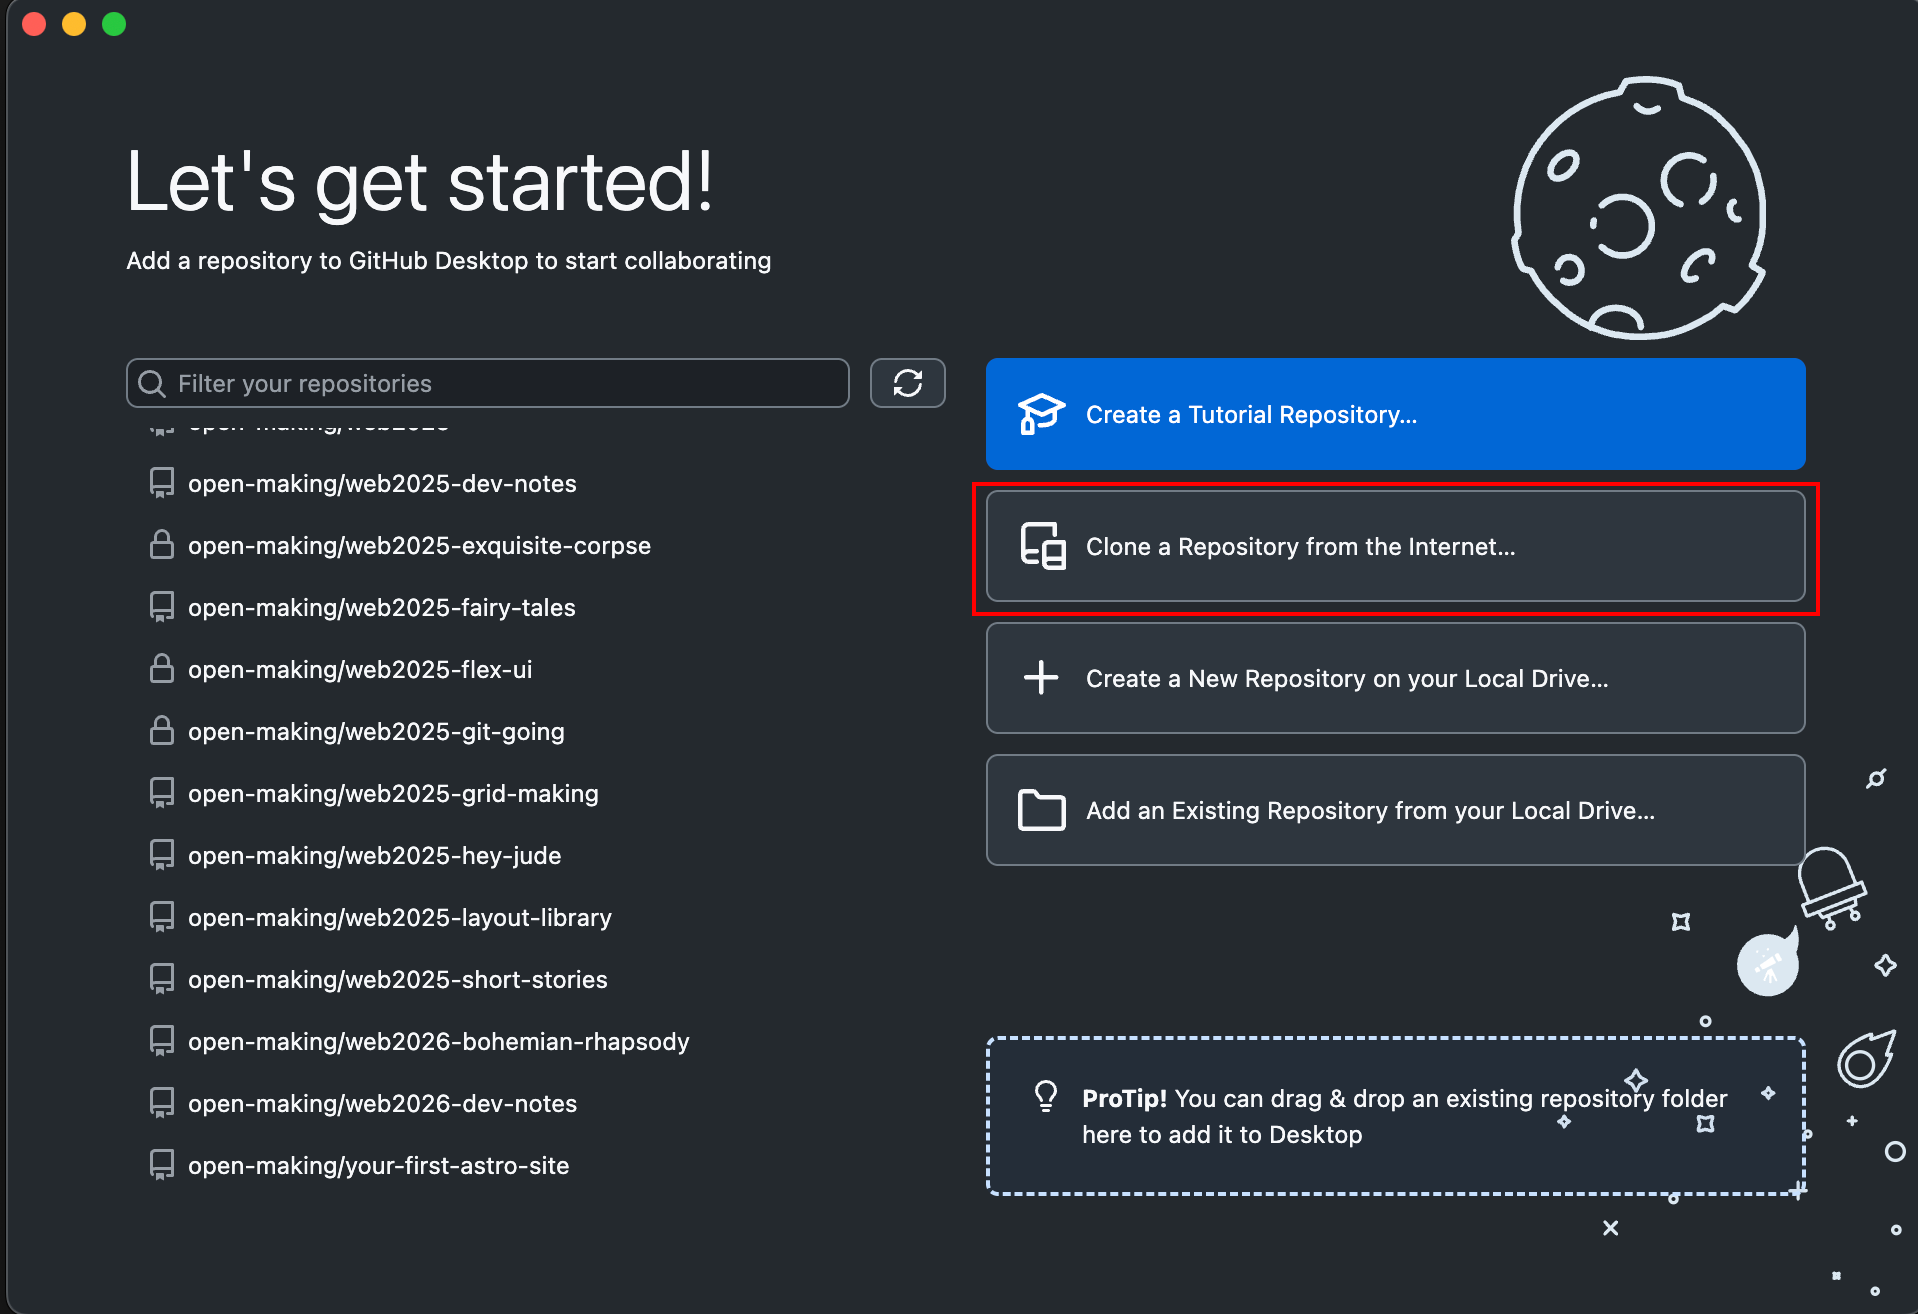
Step 2: Under the GitHub.com tab, you’ll see a list of all repositories on your account, including any forks you’ve made. Select the one you want. You can also click the “URL” tab and paste in a Github URL.
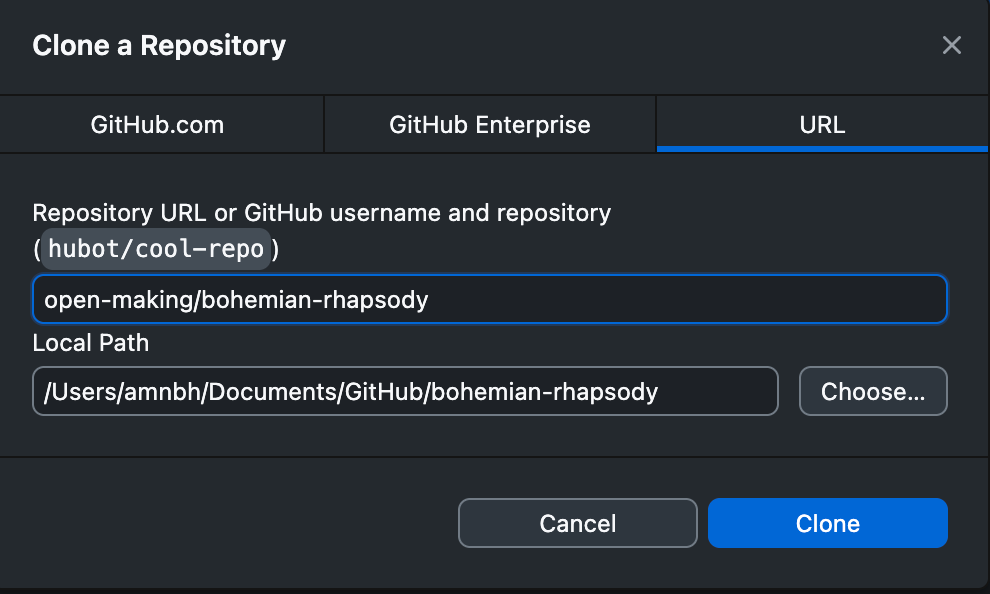
Step 3: Check the Local Path. This is where the folder will live on your computer.
Step 4: Click Clone.
That’s it! The project is now a normal folder on your laptop.
Opening a project in VS Code
Once a repository is cloned, GitHub Desktop shows you three shortcuts on its main screen. The one you want is Open in Visual Studio Code.
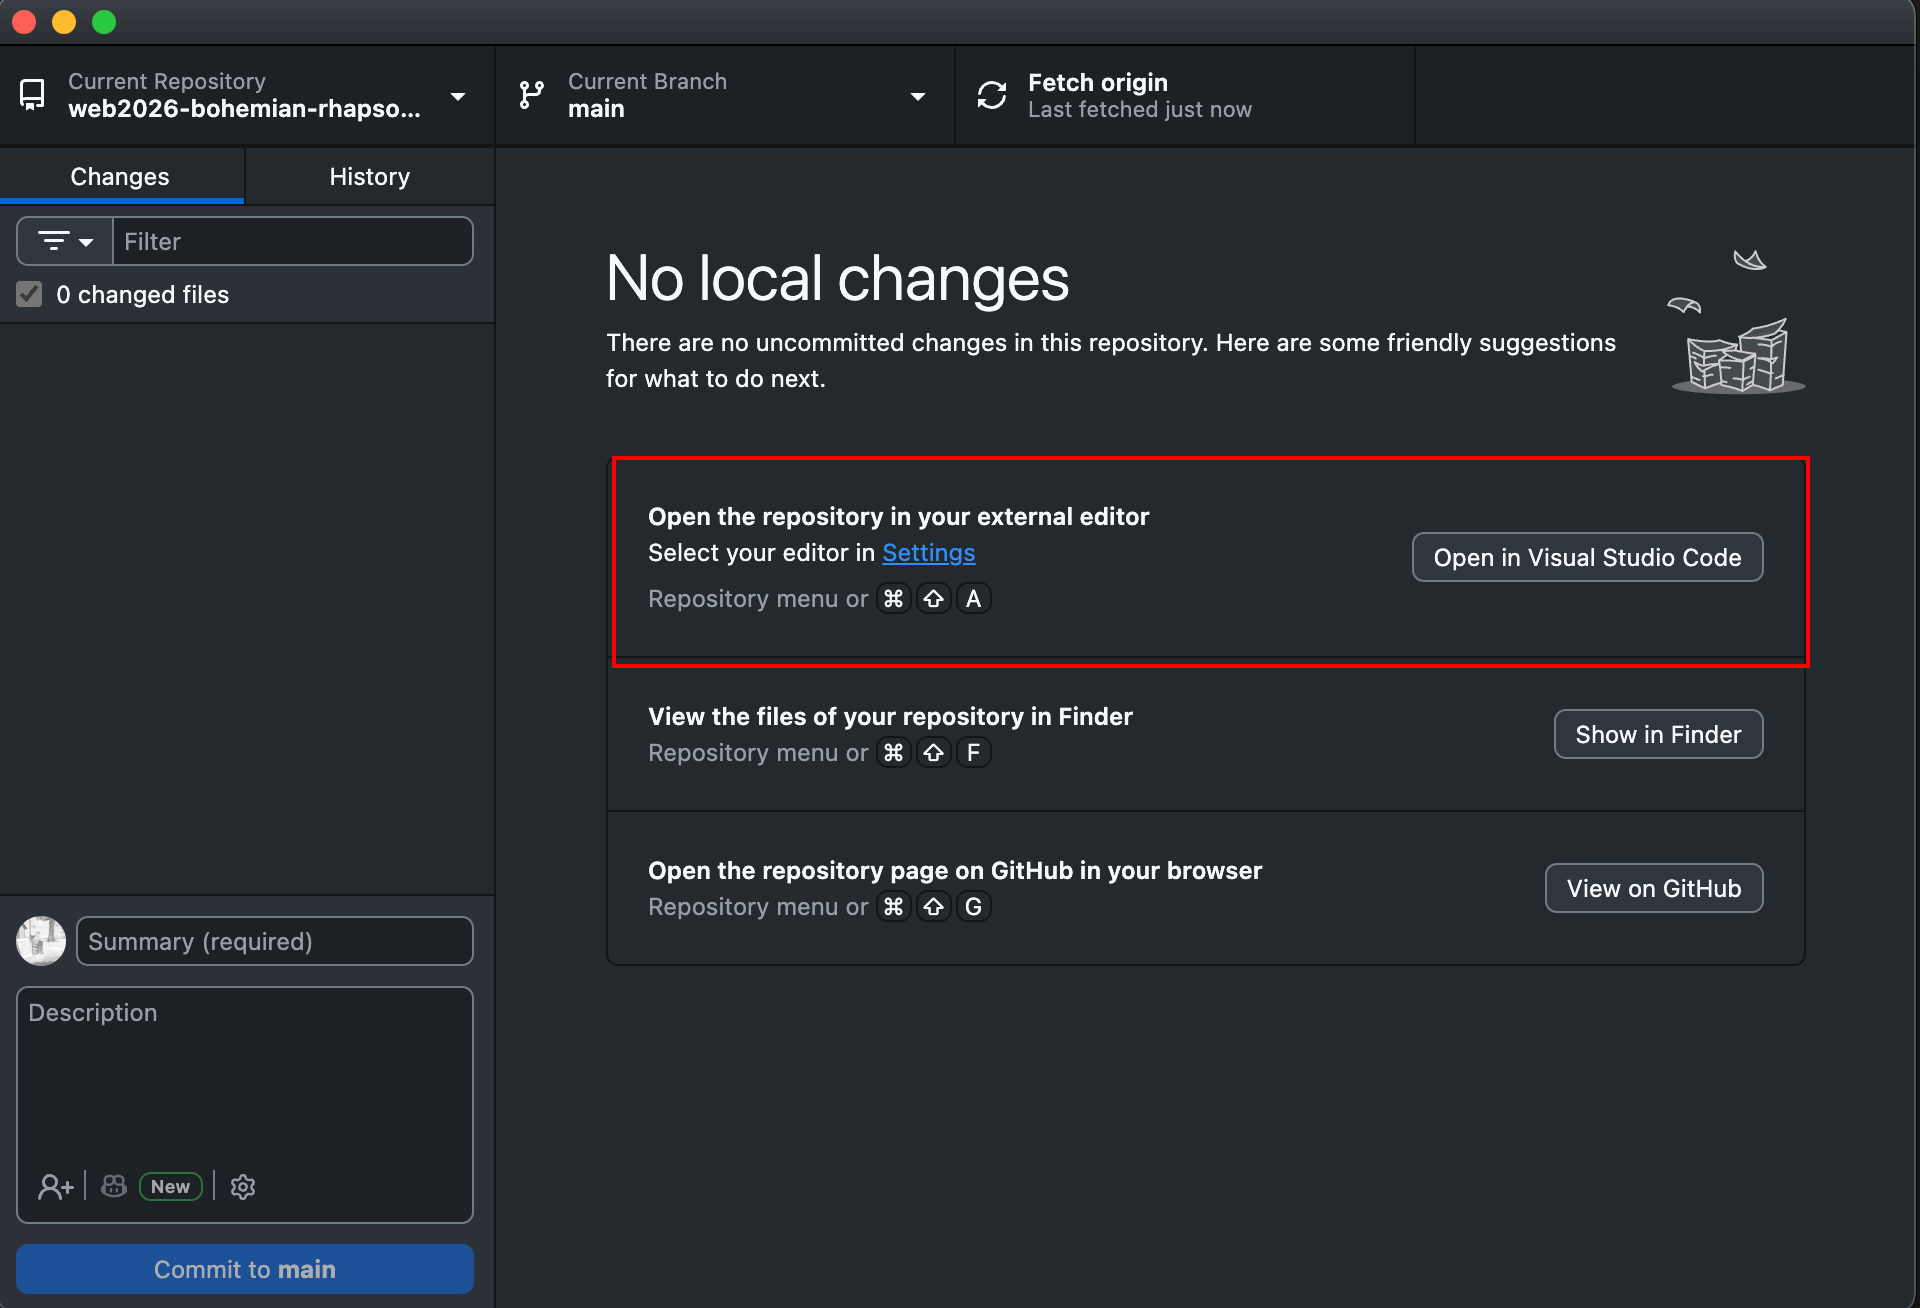
Click it and VS Code opens with the whole project folder loaded. This is how you’ll start work every time: open GitHub Desktop, pick the repository from the dropdown in the top-left, open in VS Code.
Committing your changes
You’ve made some changes in VS Code. Time to checkpoint them.
Step 1: Switch to GitHub Desktop. The left panel shows every file you’ve changed. Click on a file and the right panel shows exactly what changed: green lines are new, red lines are deleted (1).
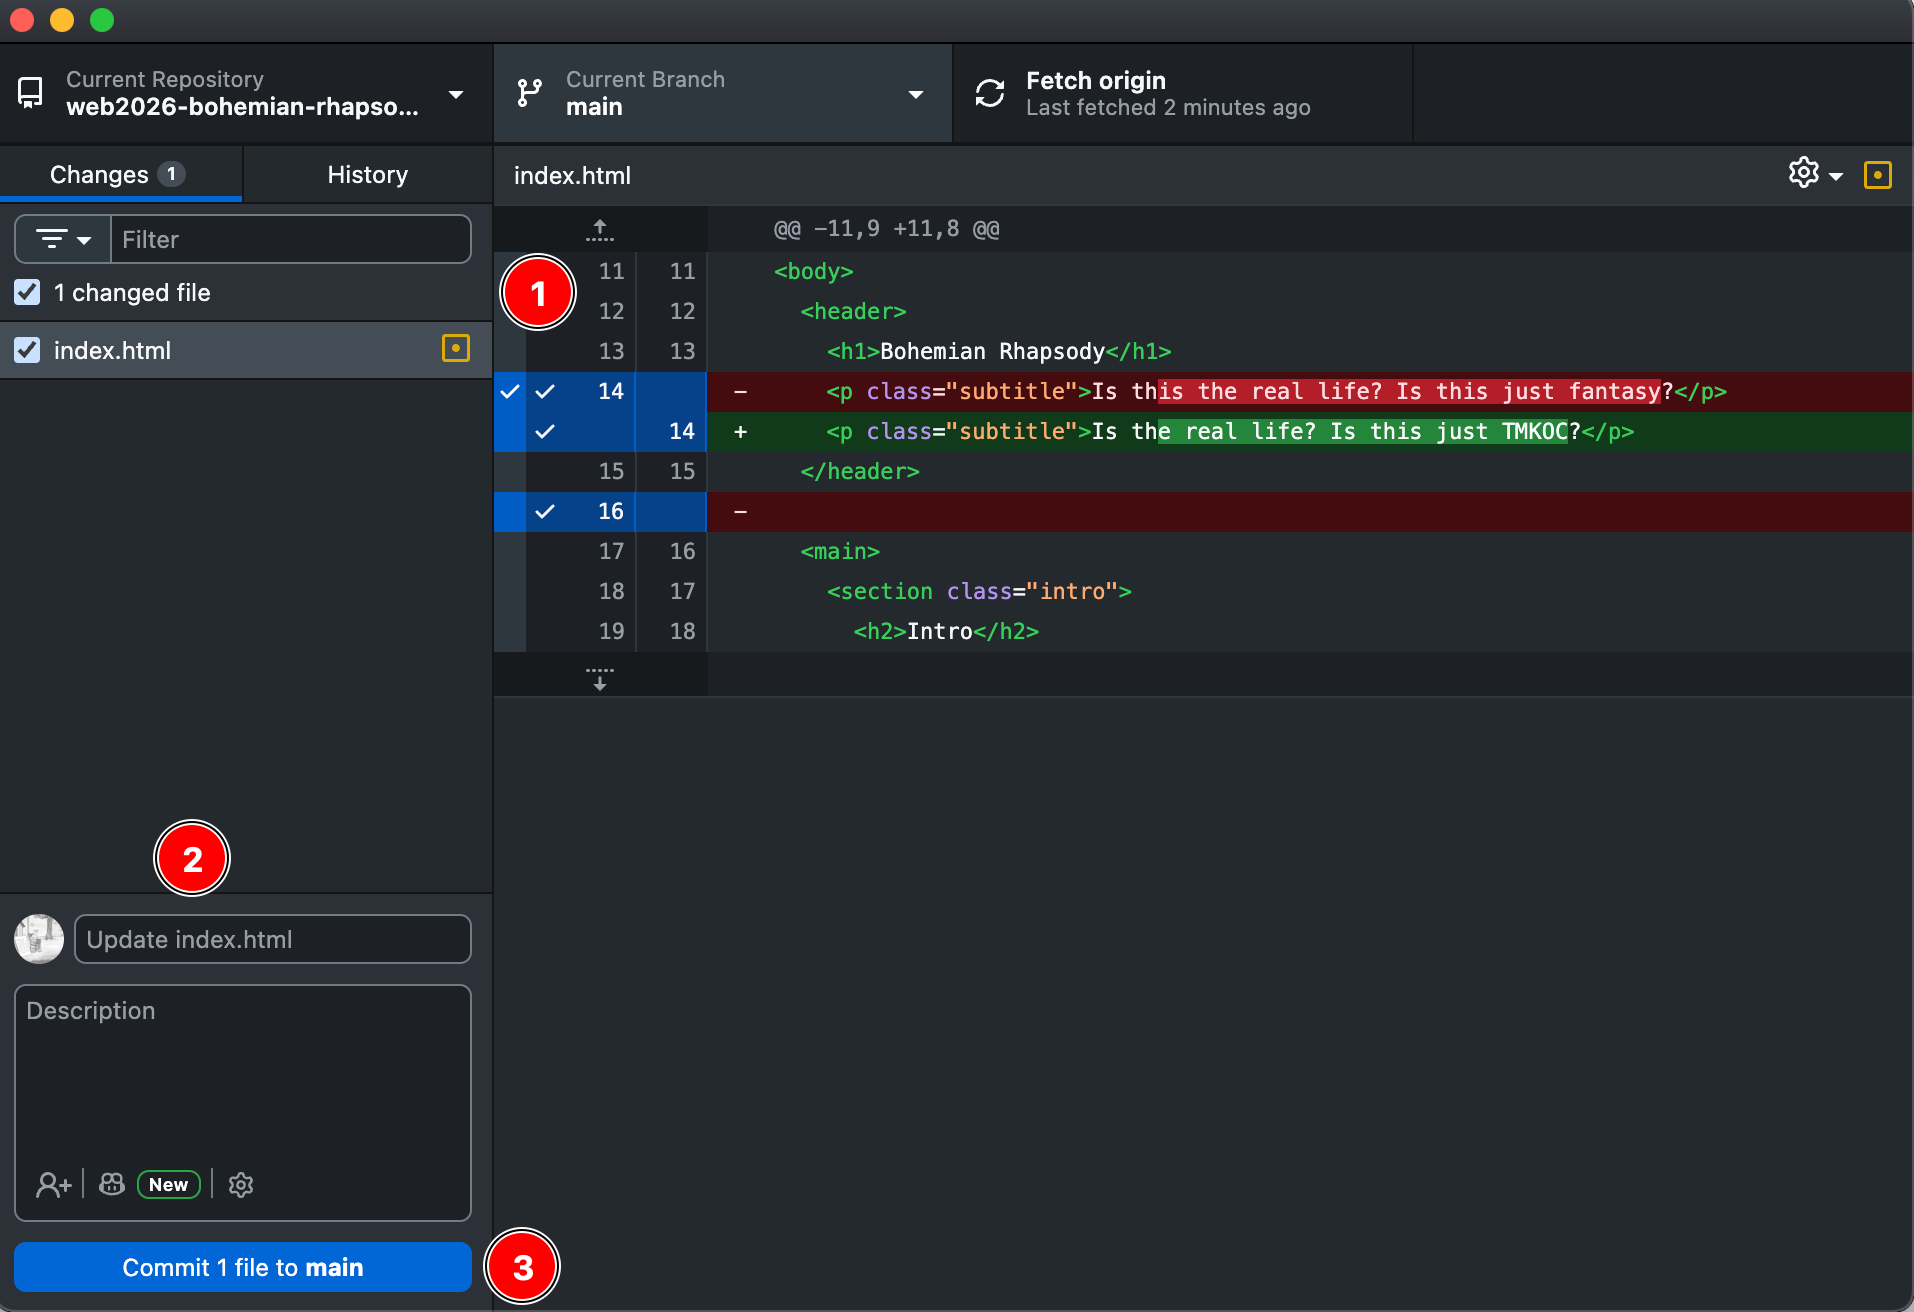
Step 2: In the bottom-left corner, there’s a small text box (2). Write a short message describing what you did. “Made the title enormous and red” is a perfectly good commit message. “changes” is a useless one, because in two weeks you won’t remember what “changes” were.
Step 3: Click the blue Commit to main button (3).
Your checkpoint is saved. But only on your laptop, which brings us to:
Pushing to GitHub
After you commit, a button appears at the top that says Push origin. Click it.
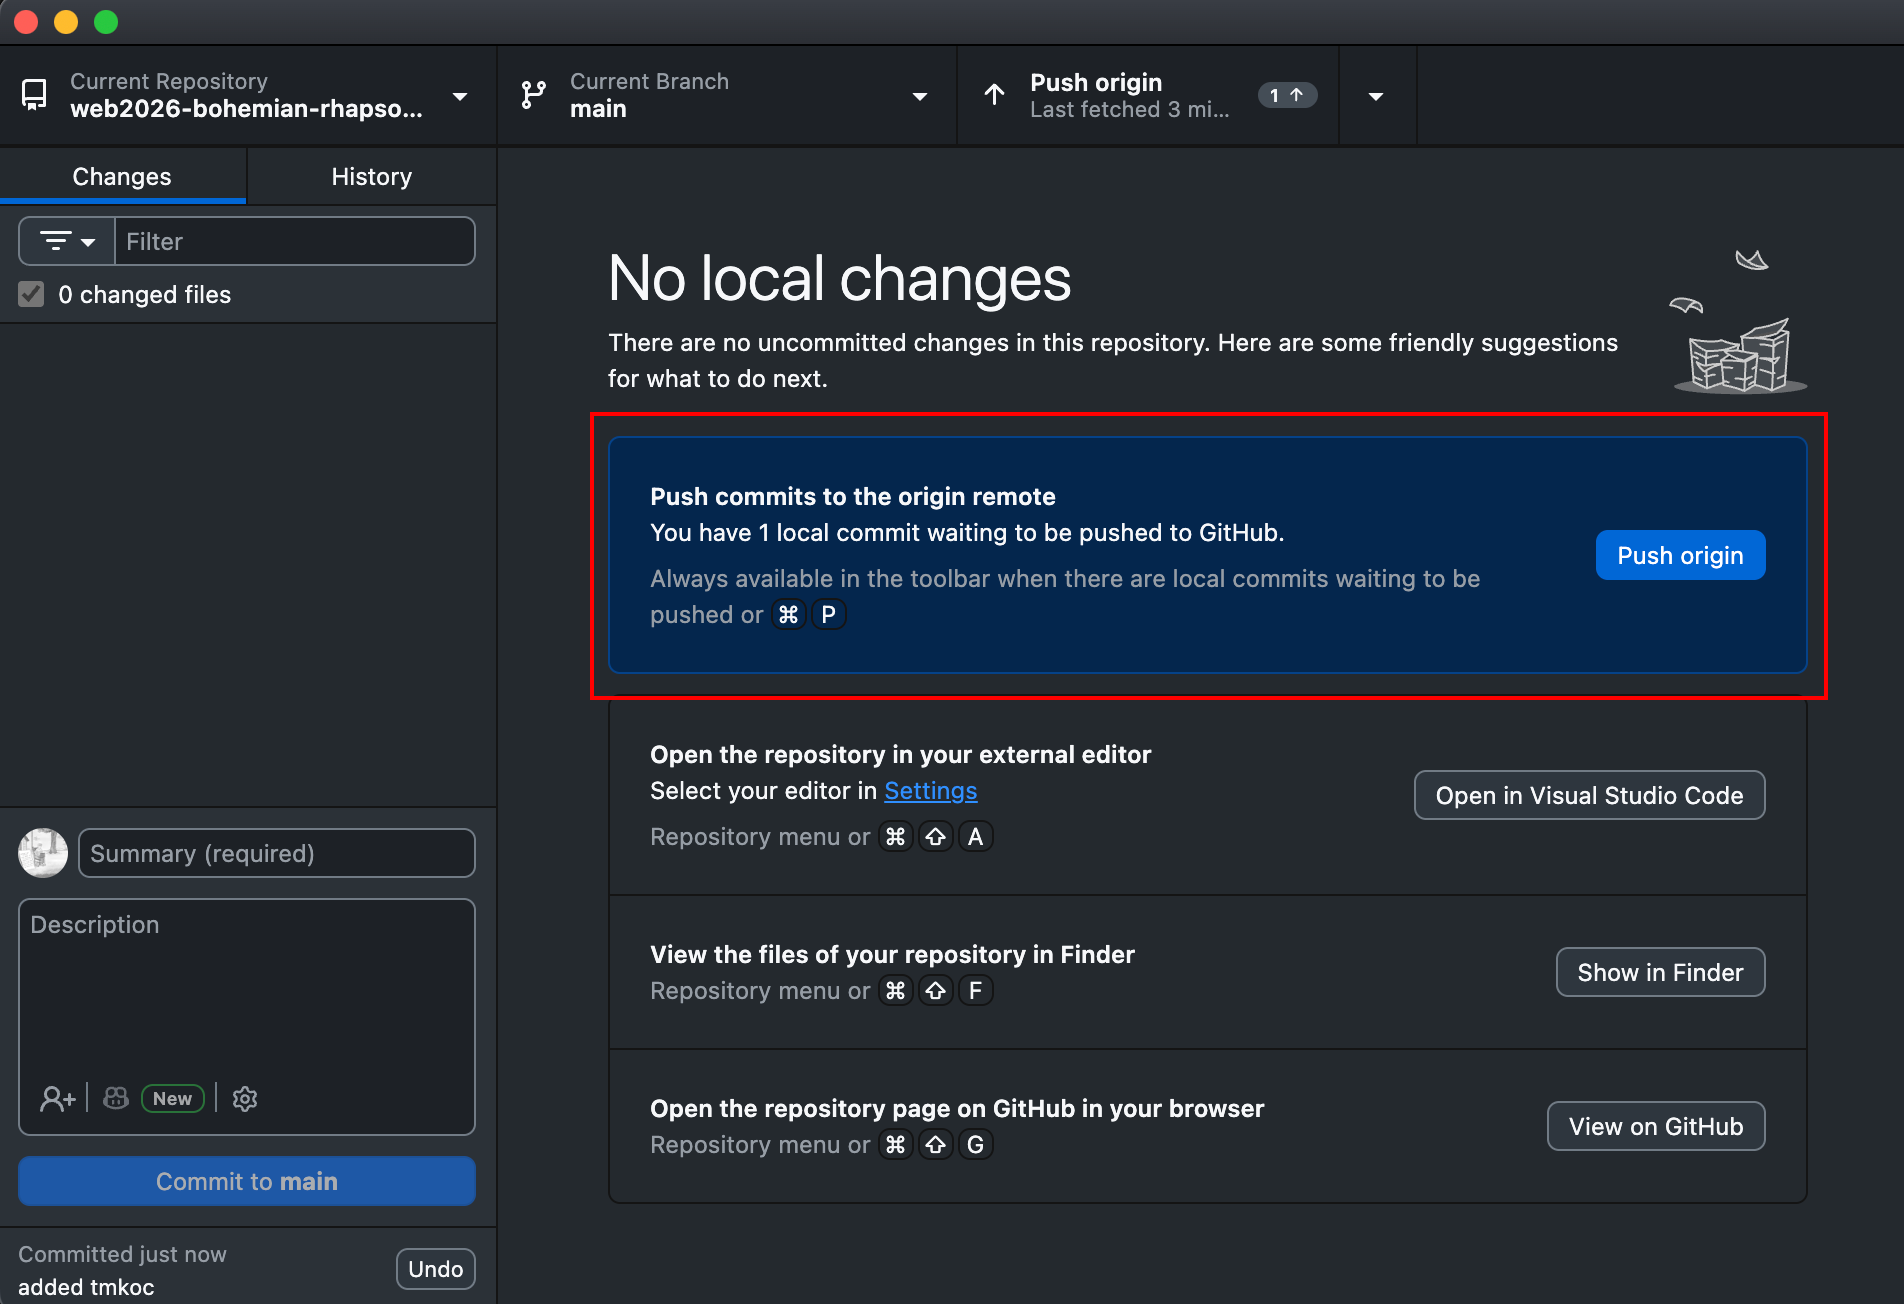
That’s it. Your commits travel up to GitHub, safe from anything that happens to your laptop. If your site is connected to Netlify, this is also the moment your live website updates.
Starting a new project from scratch
Sometimes there’s nothing to fork. You just want to start something of your own for a project, so how do you create a Github repository then? This is the reverse of cloning. Instead of GitHub → your laptop, you’re going laptop → GitHub.
There are two ways to do this, depending on whether the folder already exists.
- You have nothing yet: let GitHub Desktop make the folder for you. Start at “Creating a new repository” below.
- You already have a folder with files in it: skip down to “I already made the folder”.
Creating a new repository
Step 1: In GitHub Desktop, go to File > New Repository…
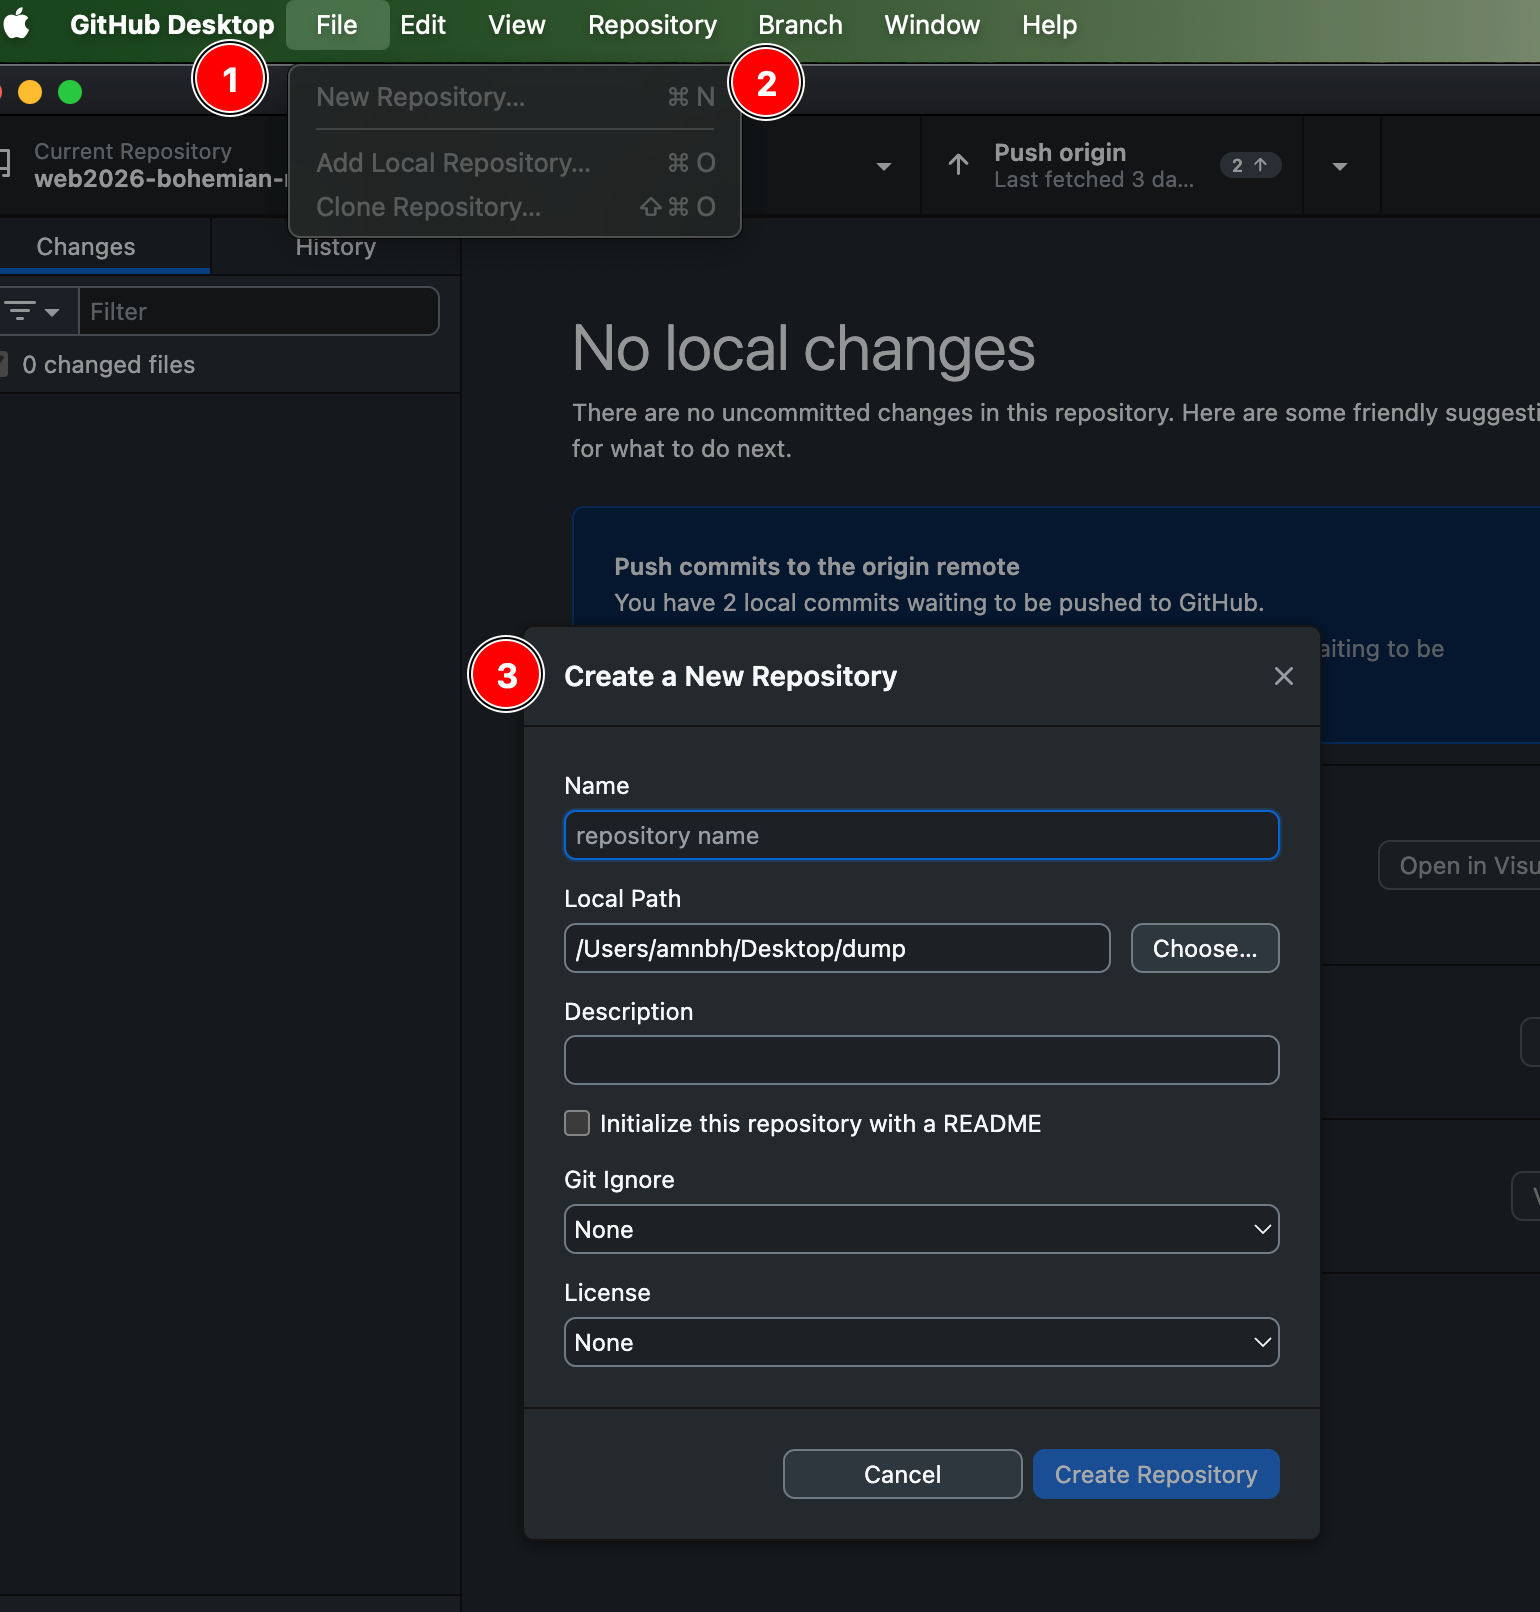
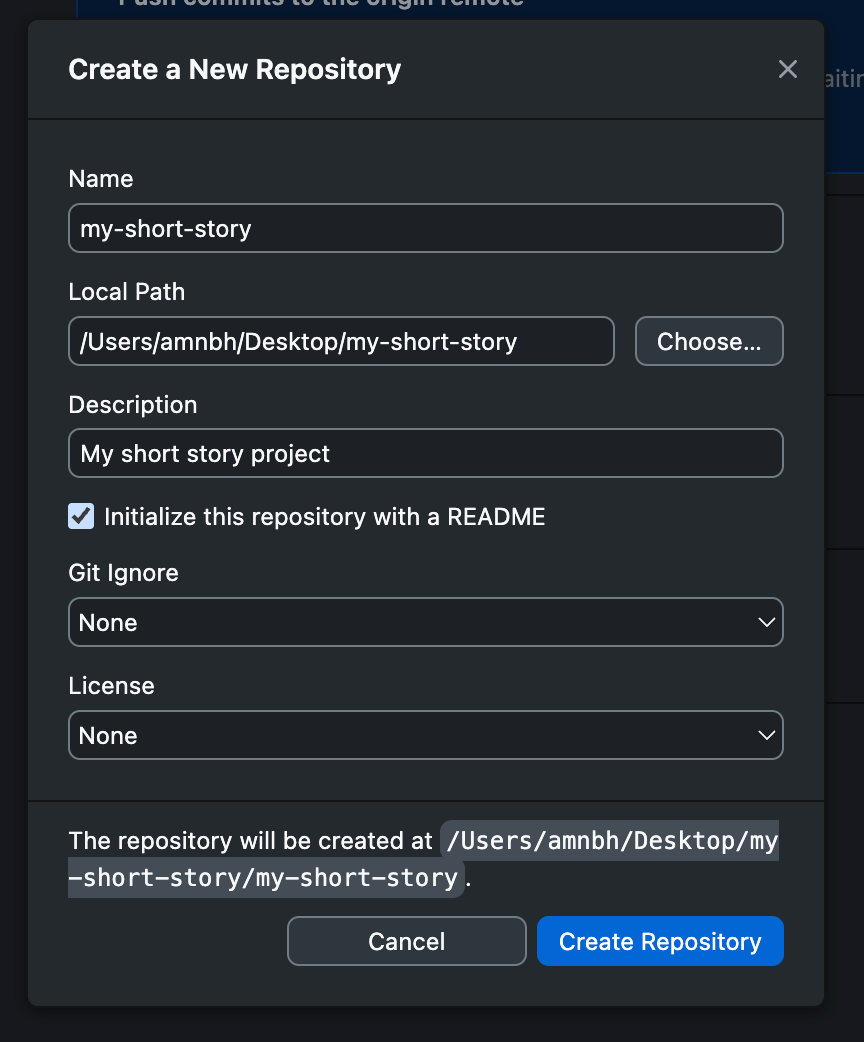
Step 2: Fill in the Name. This is the name of the folder on your laptop, and the name of the repository on GitHub. Use hyphens instead of spaces. my-first-site is good My First Site is bad. Description is optional. Write one sentence or leave it empty.
Step 4: Check the Local Path. This is the folder your new project folder will be created inside. If the path says /Users/you/Documents and your repository is called my-first-site, you’ll end up with /Users/you/Documents/my-first-site.
Don’t put a repository inside another repository. If the local path is somewhere inside a project you’ve already cloned, pick somewhere else. GitHub Desktop will usually stop you, but not always.
Step 5: Tick Initialize this repository with a README. This creates a file called README.md so your repository isn’t completely empty, which makes the next steps easier to see.
Step 6: Leave Git ignore and License as None. We don’t need them yet.
Step 7: Click Create repository.
Checking it worked
The top-left dropdown in GitHub Desktop should now show your repository name, and the middle of the screen should say something like “No local changes”.
Go and look at the folder on your computer. It’s there, with a README.md inside it. This exists only on your laptop right now. Nothing has gone to GitHub yet.
I already made the folder
If you’ve already got a folder with your files in it, you don’t need to start over.
Step 1: Drag the folder onto the GitHub Desktop window. (Or use File > Add Local Repository… and choose it.)
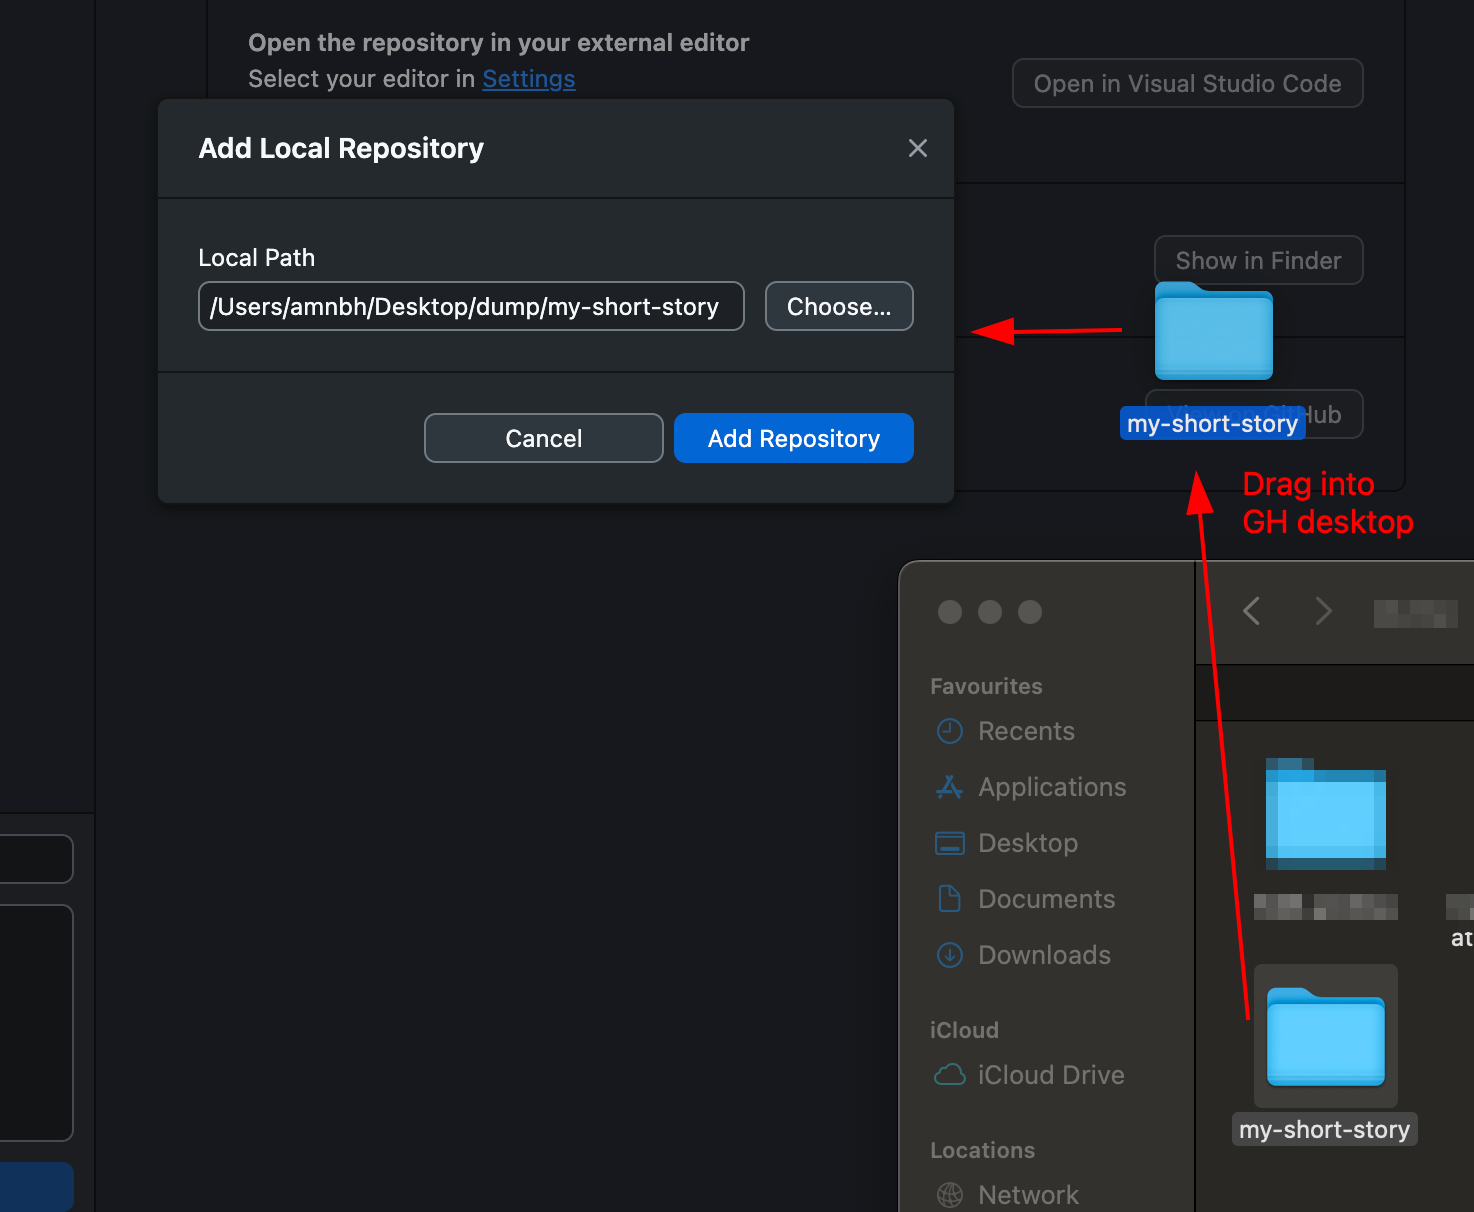
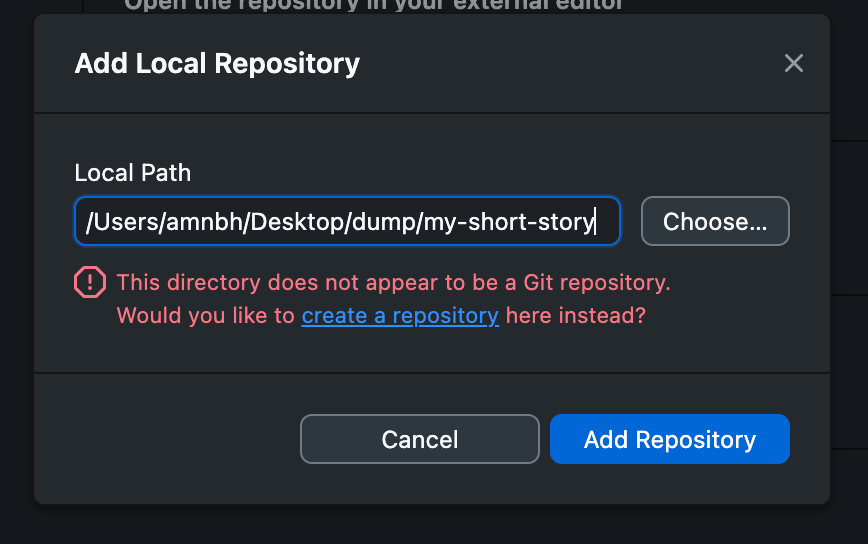
Step 2: GitHub Desktop will complain that the folder isn’t a git repository, and offer you a link that says create a repository. Click it.
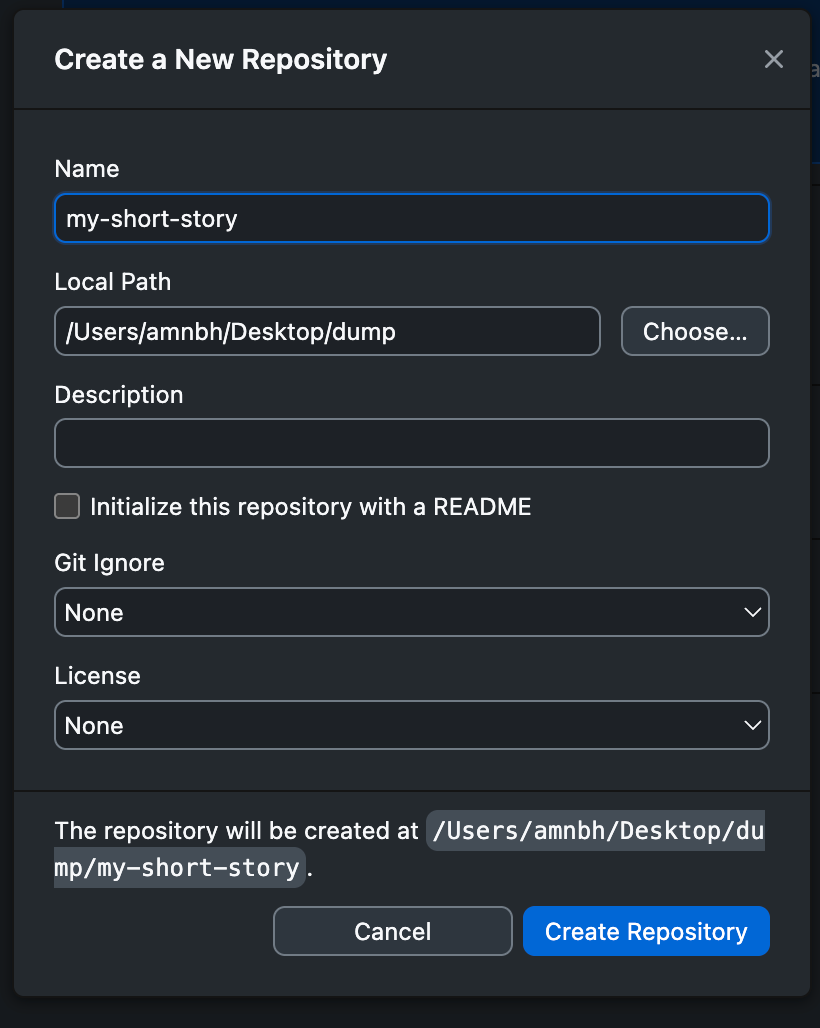
Step 3: The same dialog from the section above appears, with the path and name already filled in. Click Create repository.
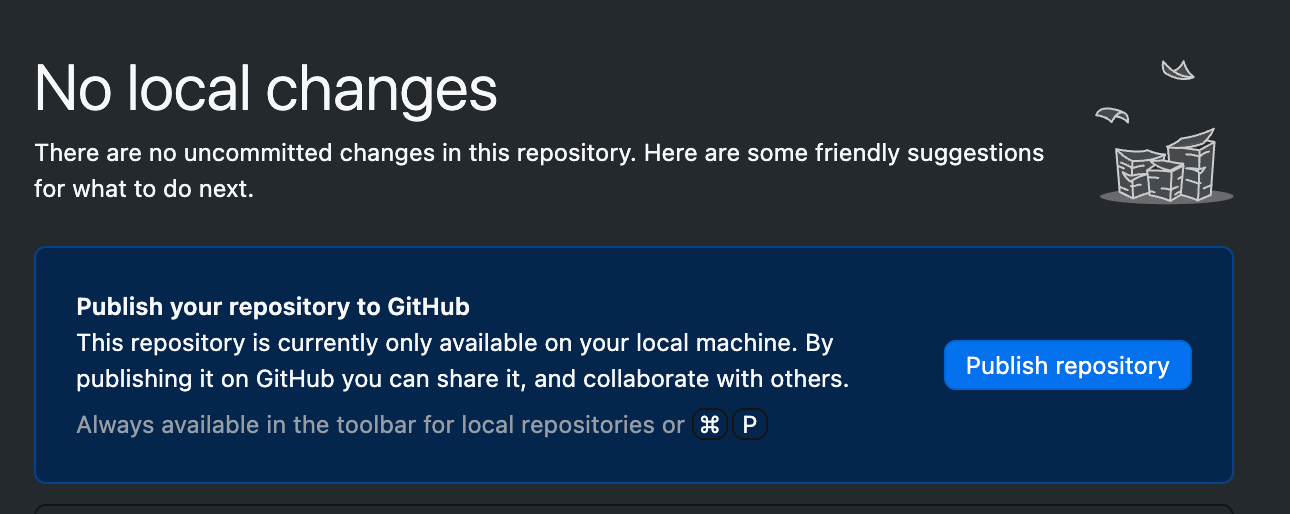
Your existing files will now show up in the left panel as changes waiting to be committed. Carry on from here.
Publishing to GitHub
Now the new bit. At the top of GitHub Desktop there’s a button that says Publish repository. Click it.
A small window appears:
- Name: the same name as your folder.
- Description: optional again.
- Keep this code private: Uncheck this! Otherwise I won’t be able to see your code.
Click Publish repository and wait a few seconds.
Checking it worked
The button at the top has changed. It now says Fetch origin, or Push origin if you’ve committed something since publishing.
Go to github.com/your-username in a browser. Your repository is sitting there, with your files in it.
If the repository is on GitHub but looks empty, you published before you committed. Go back, commit your files, then click Push origin.
Using version control inside VS Code
Everything GitHub Desktop does, VS Code can also do without you switching windows. Some of you will prefer this. Both are fine, use whichever feels better for you.
To do this within VS Code, at the left sidebar. One of the icons looks like a branching path (three circles connected by lines). Click it. This is the Source Control panel.
When you’ve changed files, a number badge appears on this icon telling you how many.
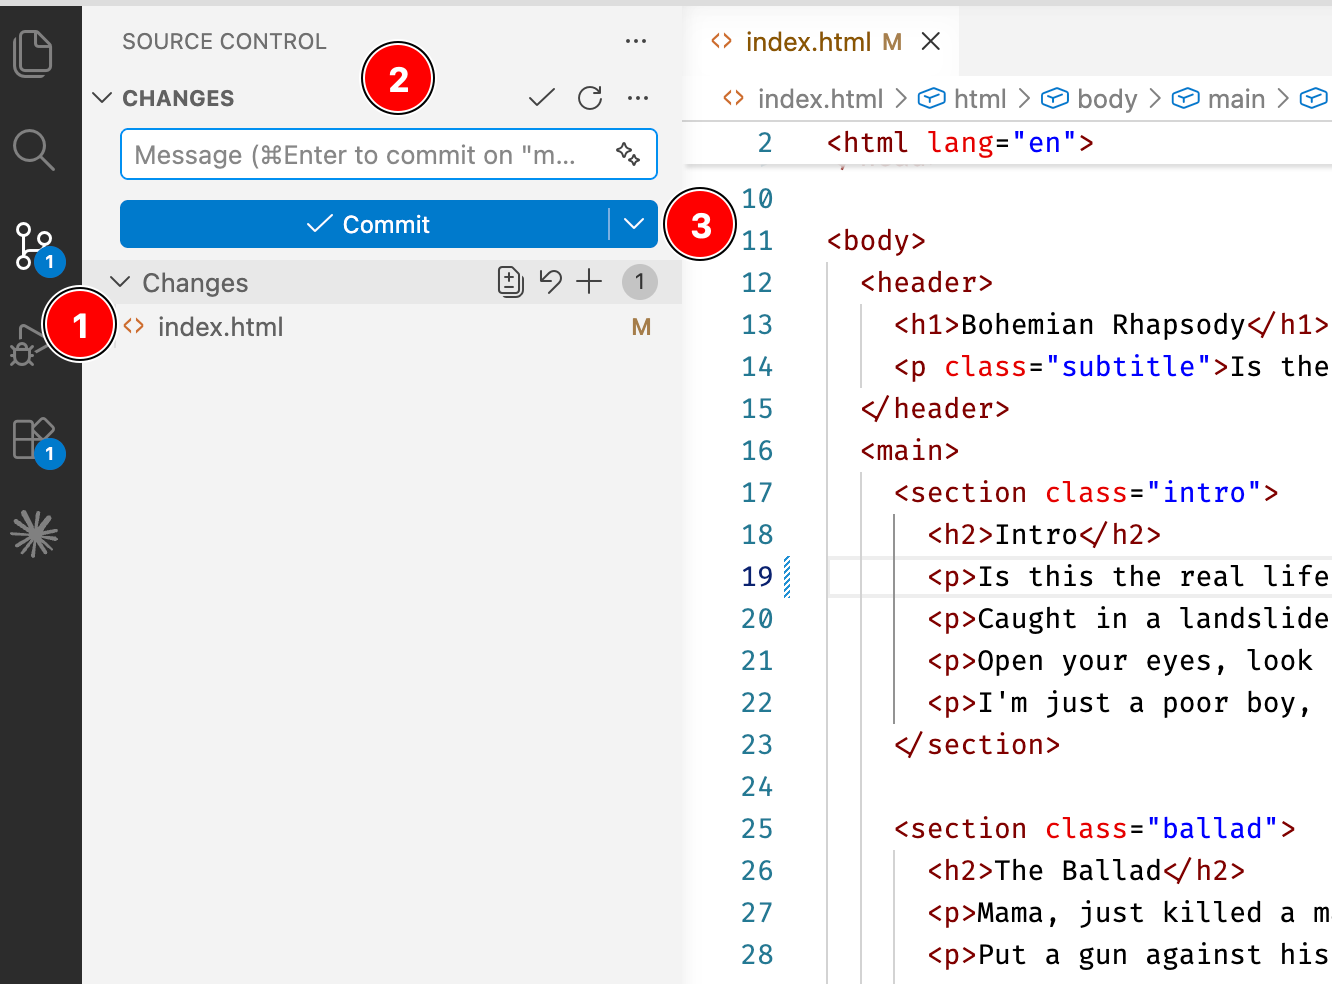
Step 1: At the top of the Source Control panel there’s a message box. Type your commit message there.
Step 2: Click the Commit button below it.
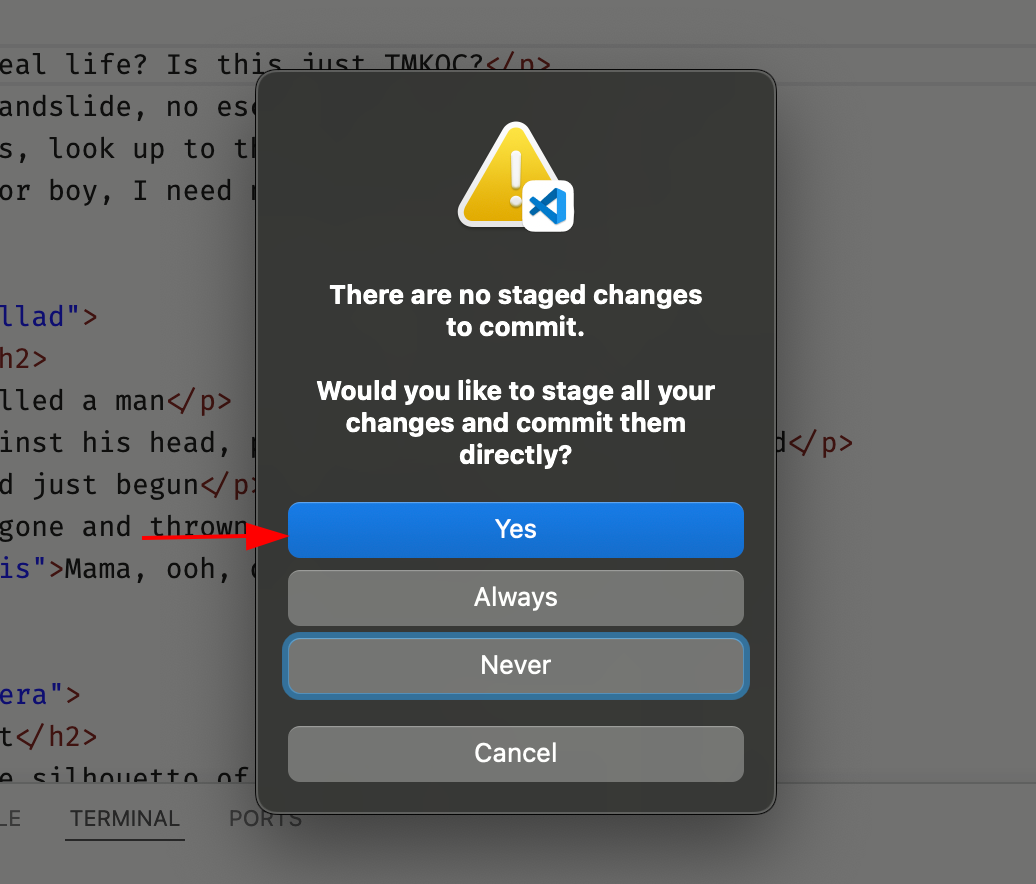
Step 3: VS Code may ask if you want to “stage all changes and commit them directly”. Say yes. (Staging is a git concept we’ll get to later. For now, yes means “commit everything I changed”, which is what you want.)
After committing, the Commit button changes to say Sync Changes. Click it. Sync is VS Code’s word for push (technically push and pull together, but that distinction won’t matter for a while).
GitHub Desktop or VS Code?
Whichever you like! GitHub Desktop shows changes more clearly and is harder to get lost in. The VS Code panel means never leaving your editor. Try both this week and pick your favourite.
Connecting your repository to Netlify
This is the step that puts your site on the actual internet. You do this once per project, and after that every push automatically updates your live site.
Signing up
Step 1: Go to netlify.com and click Sign up.
Step 2: Choose Sign up with GitHub. This matters. Signing up with GitHub is what lets Netlify see your repositories later.
Step 3: GitHub will ask you to authorize Netlify. Click Authorize.
Creating a site from your repository
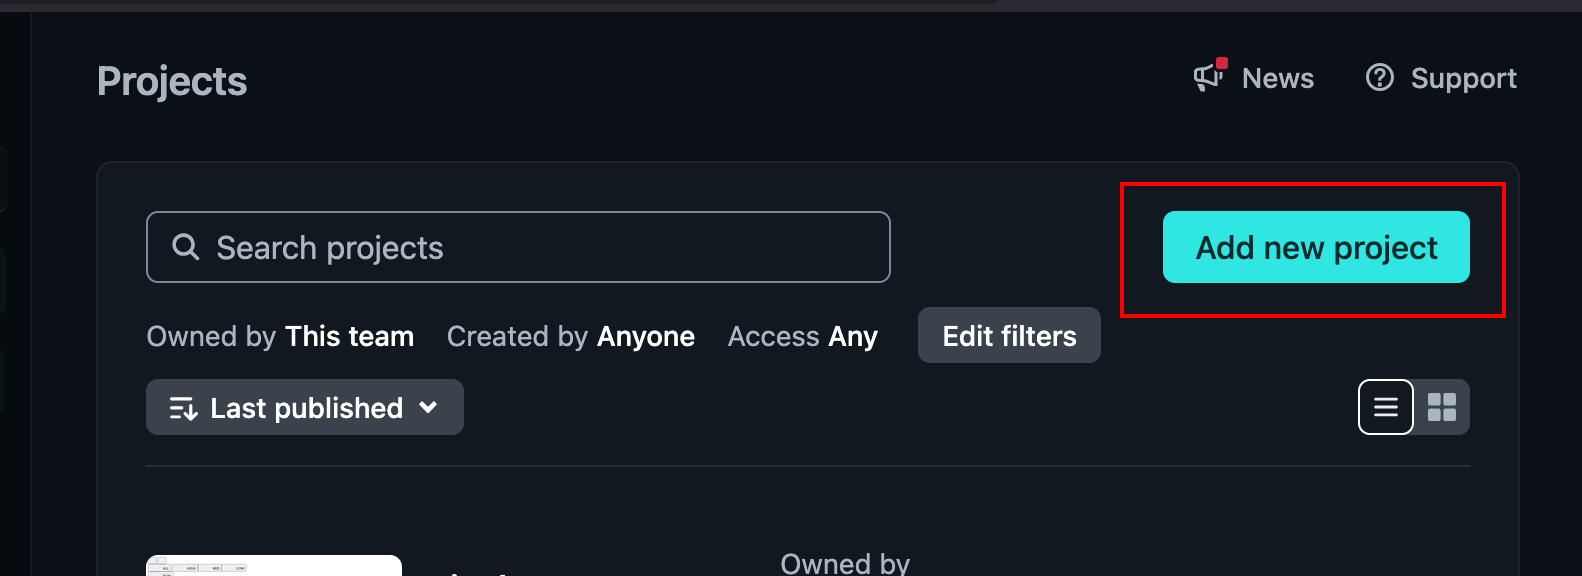
Step 1: From your Netlify dashboard, click Add new project.
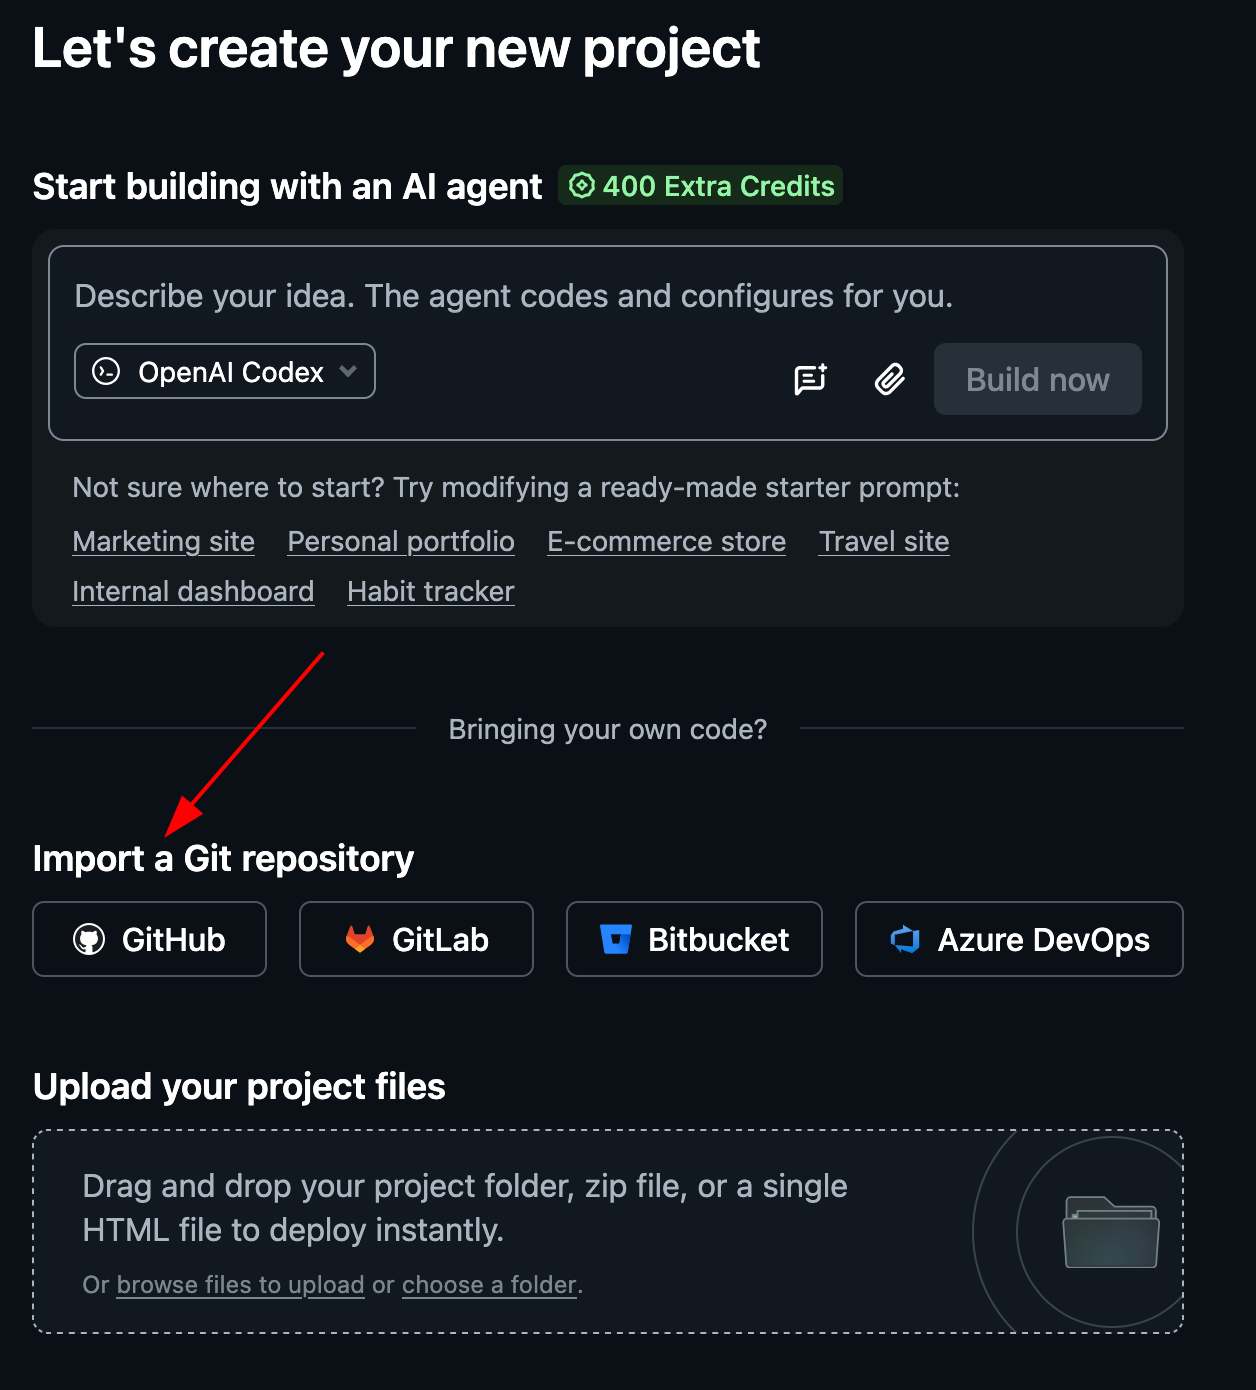
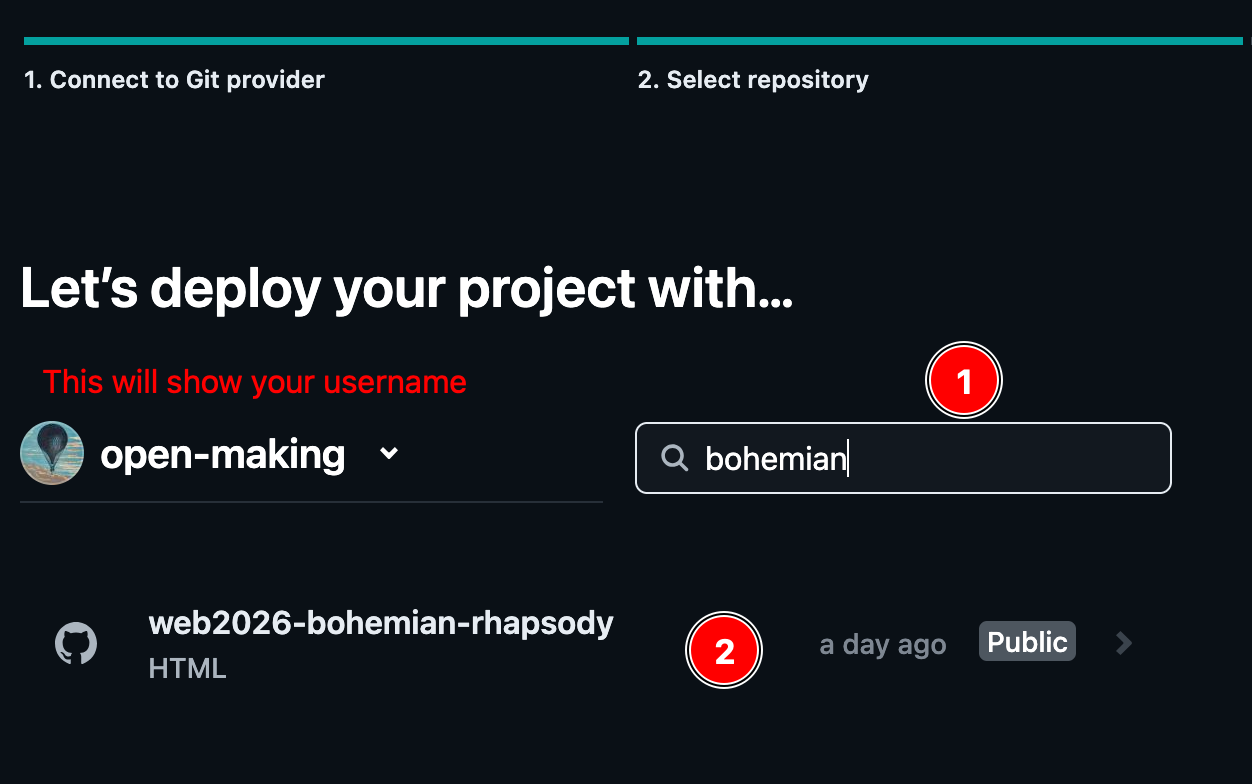
Step 2: Choose GitHub as the source.
Step 3: A window may pop up asking which repositories Netlify can access. Select all.
Step 4: Back in Netlify, find your repository in the list and click it.
Deploy settings
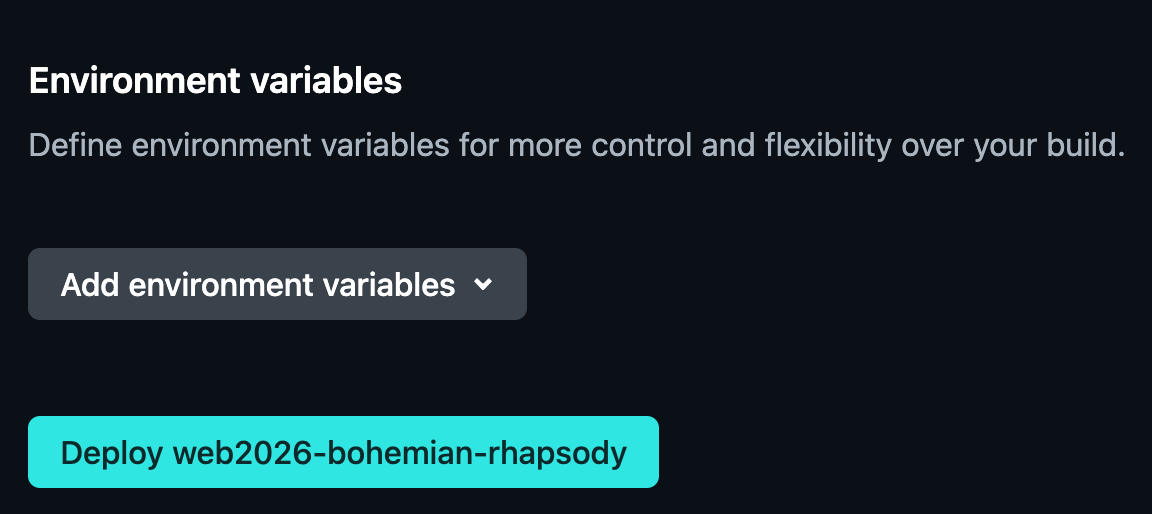
Netlify will show you a settings page before deploying. For our sites, the defaults are correct, which means:
- Branch to deploy:
main - Build command: leave it empty
- Publish directory: leave as is
Our sites are plain files, there is nothing to build.
Click Deploy site.
Finding your live URL
Netlify takes a minute or two. When it’s done, you’ll see a link at the top of your site’s page, something like glittery-samosa-4f2a1b.netlify.app. That’s your website!
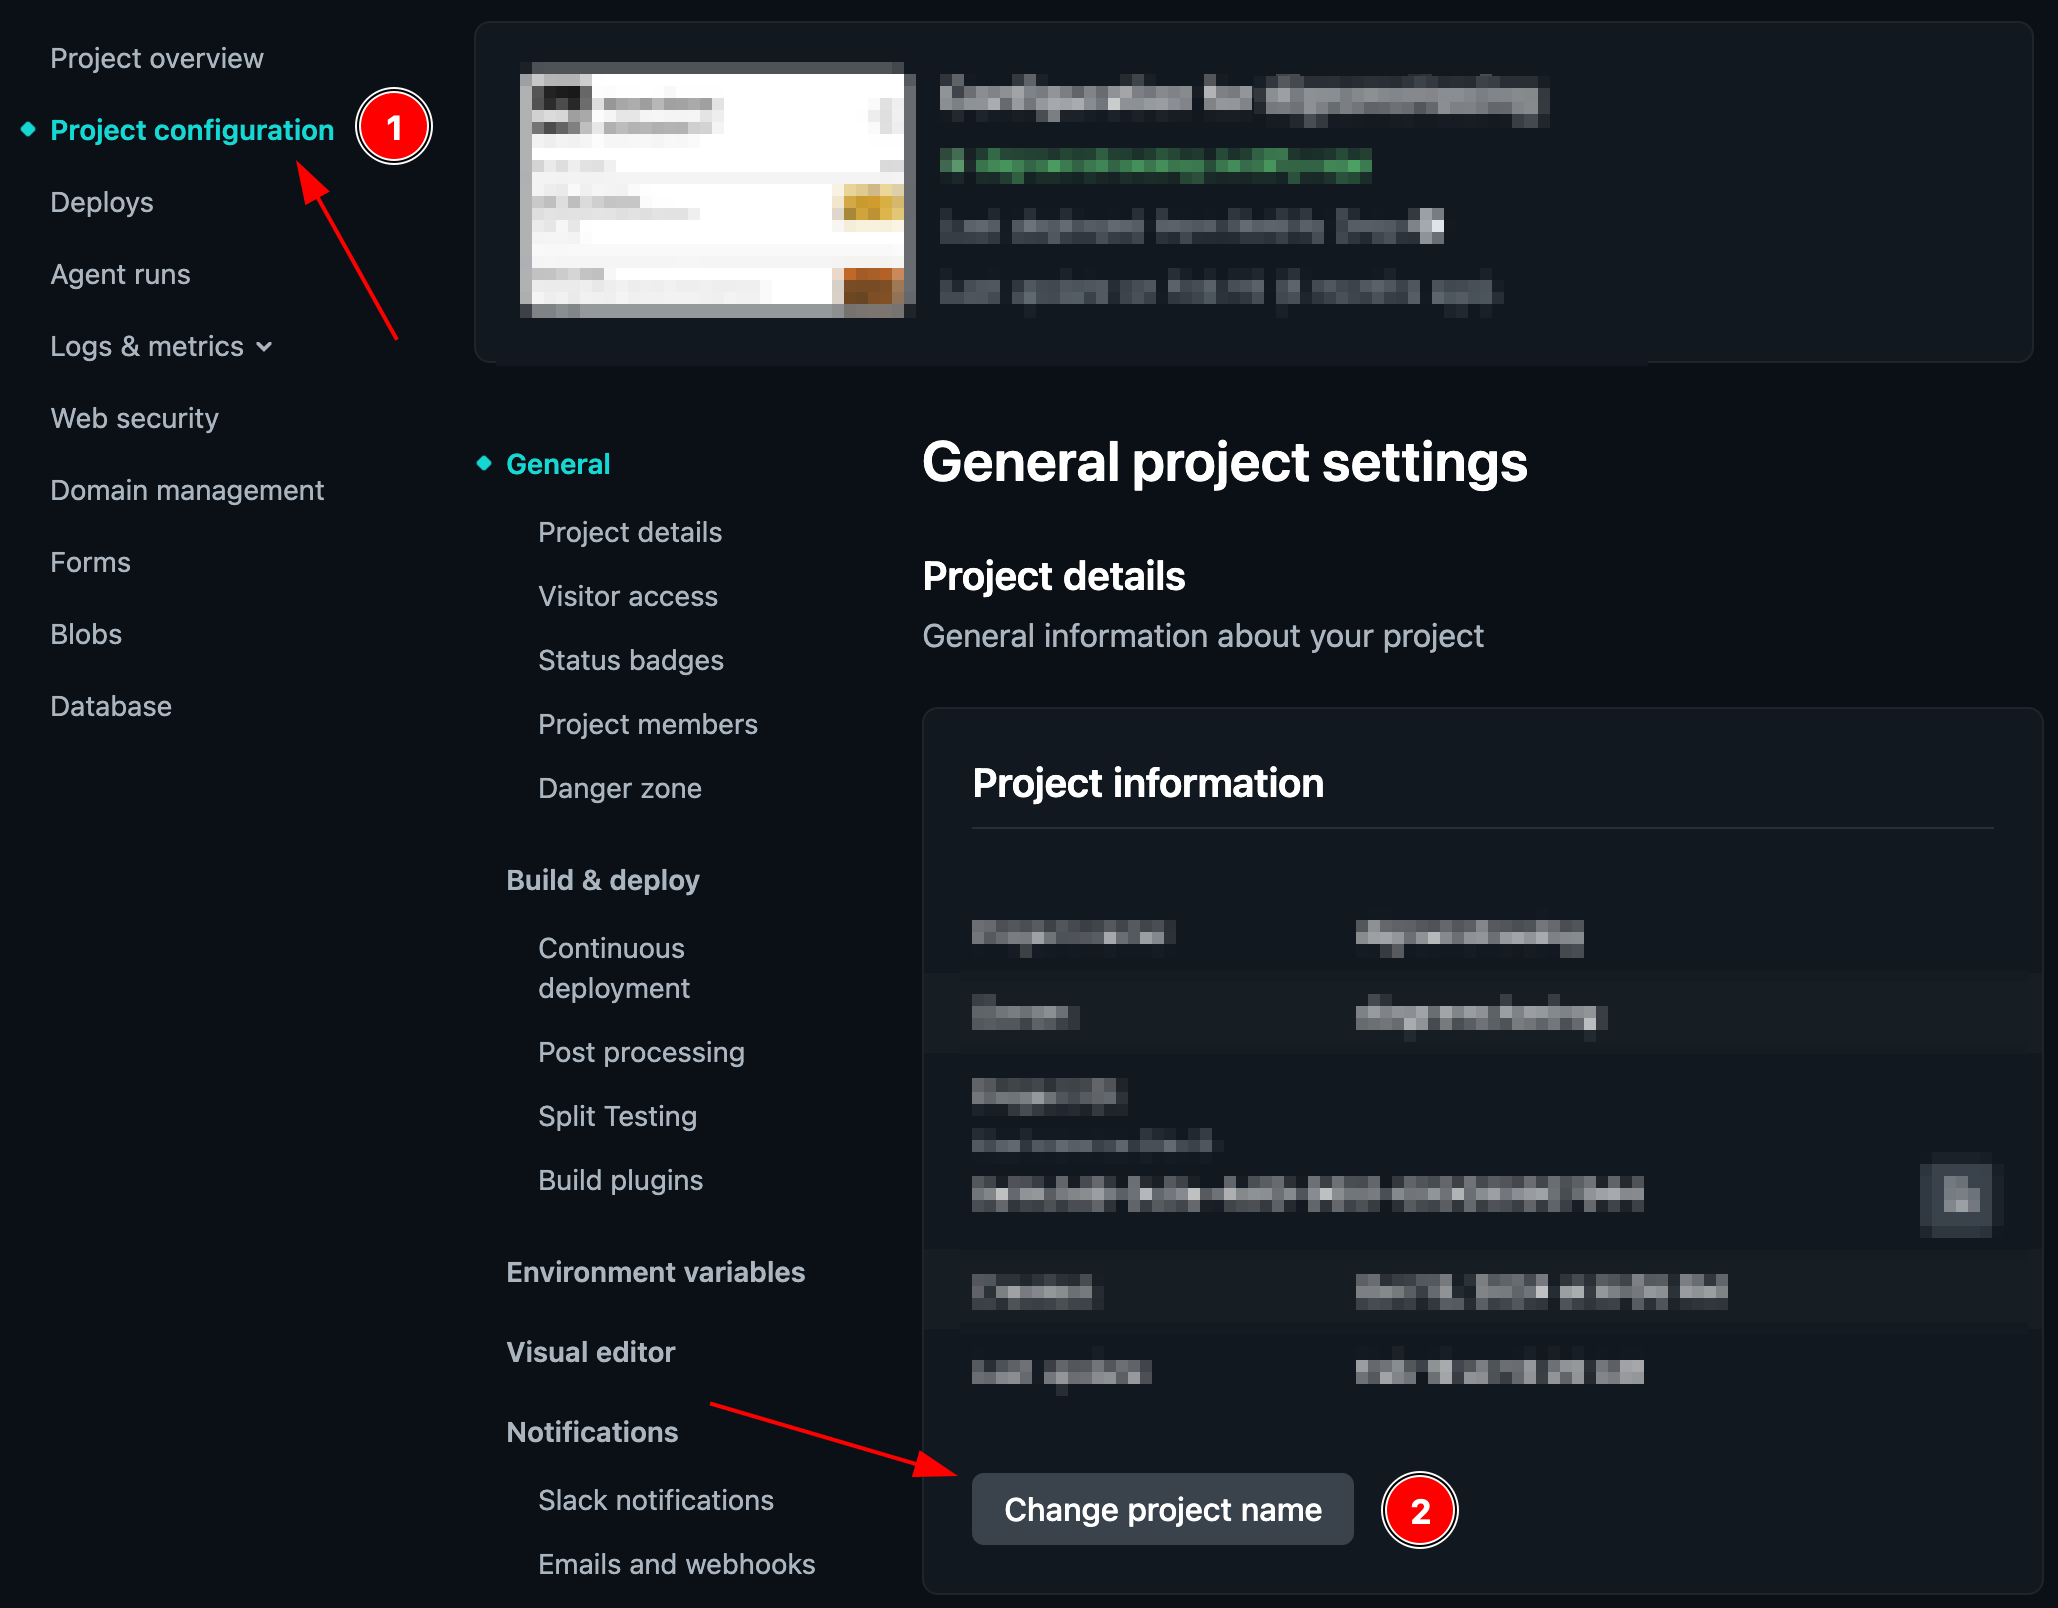
You can change this silly name: go to Project configuration > Change site name and pick something you like. The .netlify.app part stays for now.
How updates work from here
You never touch Netlify again for THIS website. From now on:
- Edit your files in VS Code
- Commit in GitHub Desktop or VS Code
- Push
About a minute after you push, your live site updates by itself. Netlify is watching your GitHub repository and republishes every time something new arrives.
Git flow
  GITHUB (the cloud)                      YOUR LAPTOP
  ─────────────────                       ───────────

  my repo ──── you click Fork ───→  your copy on GitHub
                                          │
                                          │  Clone
                                          │  (download it, once)
                                          ▼
                                    folder on your laptop
                                          │
                                          │  Edit in VS Code
                                          │  (see it live with Live Server)
                                          ▼
                                    changed files
                                          │
                                          │  Commit
                                          │  (checkpoint + message)
                                          ▼
                                    checkpoints on your laptop
                                          │
                                          │  Push
                                          │  (send them up)
                                          ▼
  your copy on GitHub  ◄──────────────────┘
        │
        │  Netlify is watching your repo
        ▼
  your live website updates 🎉
FAQs
I have committed, but my site is not updating.
Are you forgetting to push? The site updates on push, not commits.